• Extreme makeover
  • Techtip IDE June 2015 US
  • Techtip 1 UK
  • Simple client/server
  • Dealer Key
  • ODBC 64/32 bit
  • ODBC Driver
  • JavX on PDA
  • Pseudo Printer
  • Ring Bell under XP
  • Search Rules
  • Convert to ProvideX
  • WindX
  • Webserver
  • ASCII Files
  • LINK Files
  • Windows Printing
  • Activation problems
  • POS function
  • Select verb

Quickly and easily give your application a different look? It’s possible with ‘Themes’ and ‘Visual Classes’.

Themes are the earlier Templates. These define the default settings for various display properties of objects
in the entire library and are therefore set in the ‘library defaults’.

Visual classes relate to a single object. So you have to select them per individual object.

In this example we will only work with buttons, but other objects are also possible.

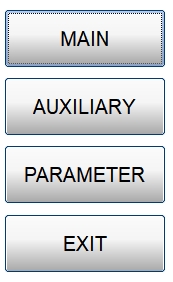
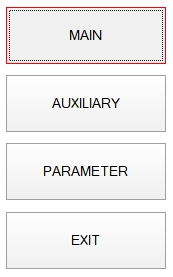
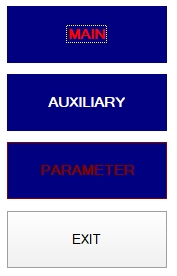
We take these buttons as an example:
Font:               Arial, 20 points
Foreground:  default
Background: default

We are now going to create a ‘Theme’.
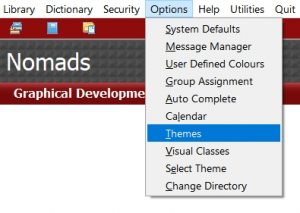
For this we start Nomads and choose in the menu > Options > Themes

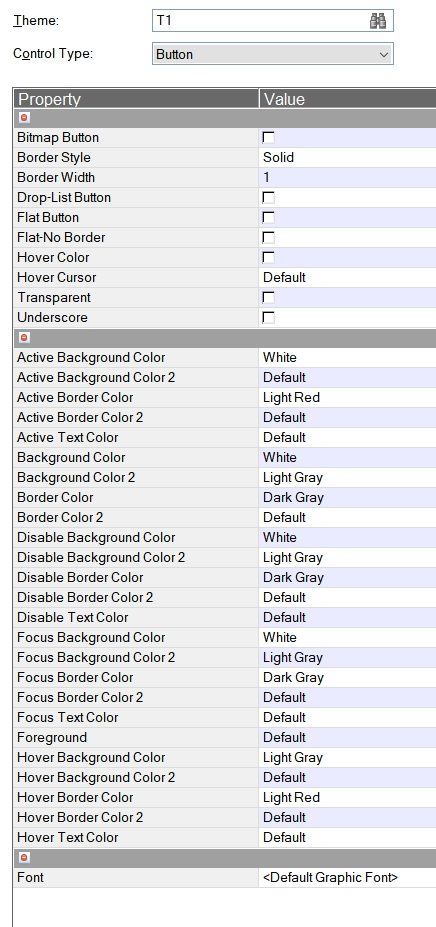
You enter ‘T1’ and select control type:  Button

You will see a number of extra options that you normally can’t choose for a regular button,
for example ‘Hover Border Color’

We want to display a red border around the buttons when the mouse is over a button.
In this example, we have also set colors to other button properties.

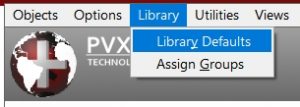
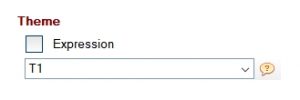
We now link Theme ‘T1’ to our library, through ‘Library Defaults’

Then choose the TAB ‘Font / Clr’ and select T1

If we now start a panel with buttons and we move the mouse over the buttons, then we
immediately see that the buttons have a red border. You will also see a different font size,
different colors and sharper angles. All buttons in all panels of this library now get this look.

Sometimes however, you want certain buttons to look different. That is when you need ‘Visual
Classes’. We return to the main screen, choose menu> Options> Visual Classes

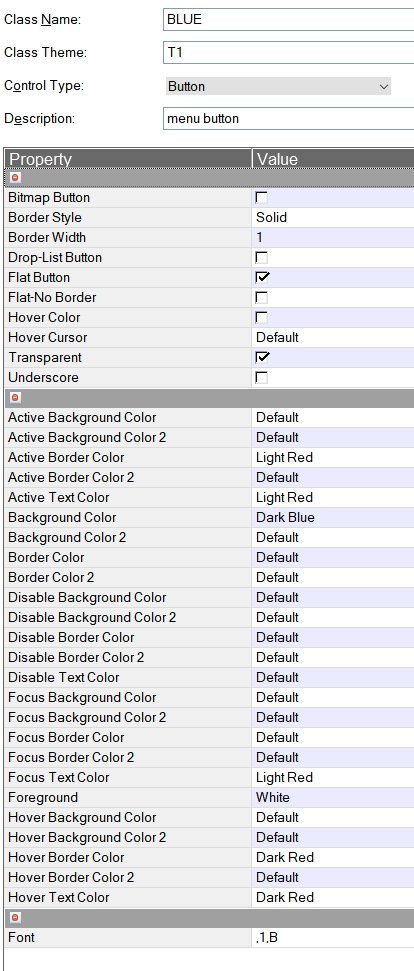
As Class Name, we choose ‘BLUE’, theme: ‘T1’, control type: ‘Button’

You will see the same properties as with a theme.

We now want a flat, transparent button that is dark blue with red text when it has focus, and a
dark red text when the mouse is over a button.

It may be necessary to try various settings by trial and error in order to achieve the look you are
looking for.

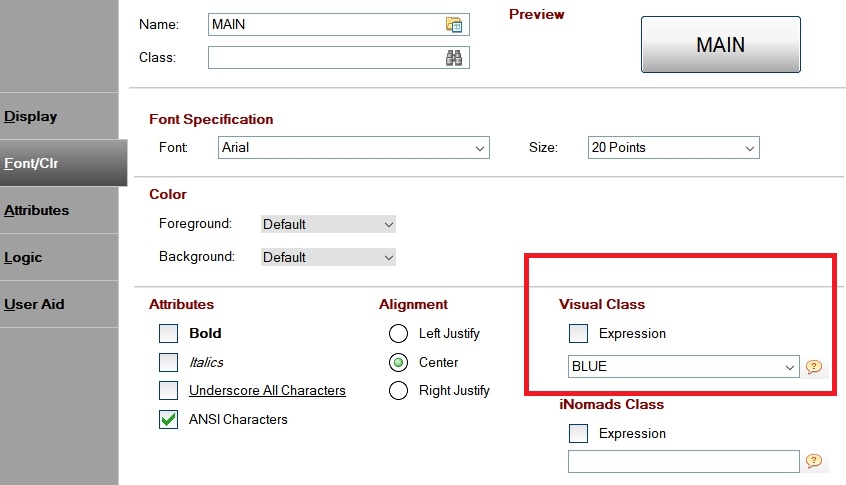
We save these settings and now set this Visual Class ‘BLUE’ for a button in our panel.

Enter the properties of your button. Select the ‘Font / Clr’ tab and select Visual Class ‘BLUE’.

We repeat this for the ‘auxiliary’ and ‘parameter’ buttons, but not for ‘exit’, so we can clearly see
the difference.

Test and/or start the panel: when you position the mouse over the ‘parameter’ button, this will be
the result:

IDE

Already tried the new IDE? IDE stands for “Integrated Development Environment ” and is very useful for a developer. All the tools available in PxPlus are there.


How to start IDE?
In console mode, enter: IDE
or shortcut: E:\PvxPLUS12\pxplus.exe *ide/launcher


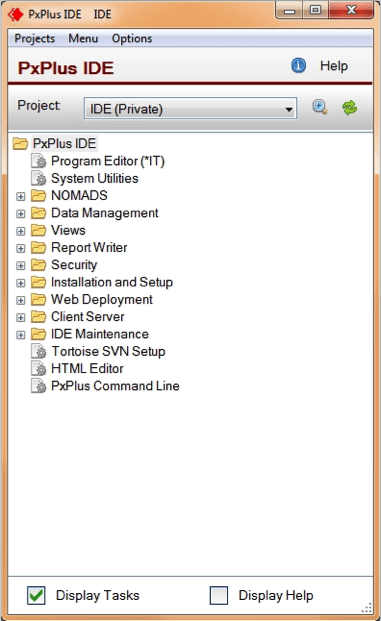
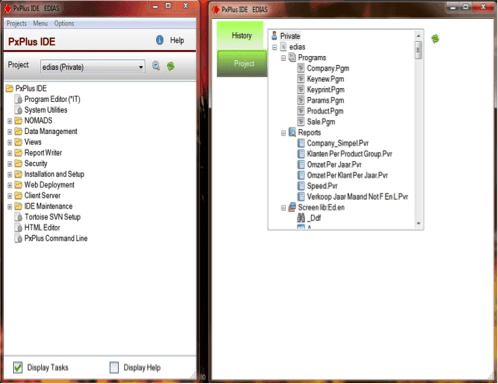
You will then see this screen:

techtip-june2015-US-1

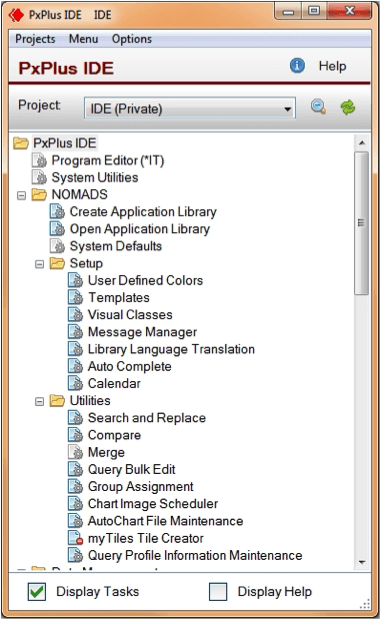
Or this, with unfolded tree view:

techtip-june2015-US-2

Note that packages or options that are not accessible are marked with a small red minus sign, as in the example above right, ‘myTiles Tile Creator’.


You will also see ‘Projects’ standing on top of the page. Here you can create a variety of projects. It is logical that you group categories per directory. For example, ‘accounting’, ‘billing’, ‘payroll’, …

At EDIAS every customer has a separate directory. For each client a project has been created, which it’s directory is connected too.

When we now start Nomads from a project of client X, then automatically the appropriate directory will be active.


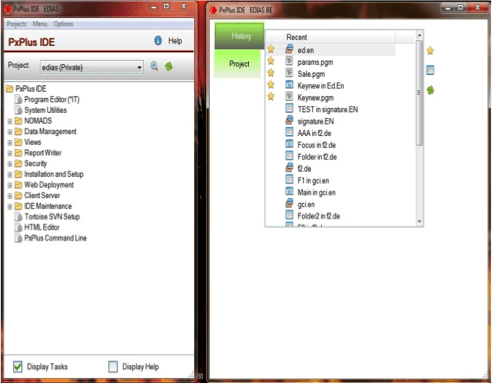
A second screen is the “tasks” window. (click on ‘display tasks’ on the main screens left bottom)

In it there are two tabs, namely ‘History’ and ‘Project’

techtip-june2015-US-3  techtip-june2015-US-4

At History you will get a list of recent tasks you have performed. Including those of any other projects. The list is automatically completed once you’ve edited a program in IT, or you have edited a panel in Nomads. You name it.

At Project, you will get a list of all panels, reports, programs, etc … belonging to the project which is active.


How do you add all those panels, reports and programs to a project?

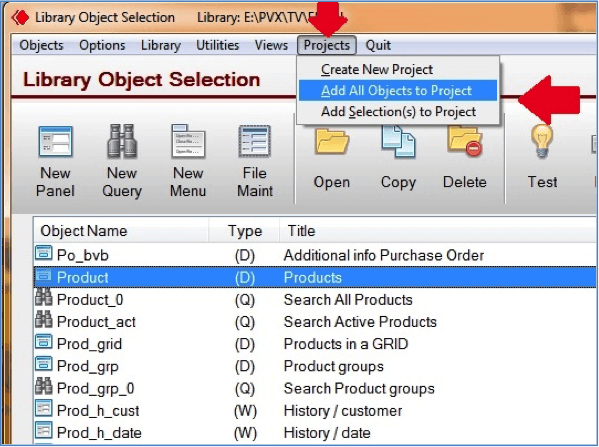
Well, in a lot of tools you can now find a menu item ‘projects’.
For example, in Nomads.

techtip-june2015-US-5

Here you can choose whether you want to add only selected or all panels to a project.


Also select another option from the list of applications in the main window and then tick ‘Display Help’ on. You then get the proper contextual interpretation associated with the selected module.


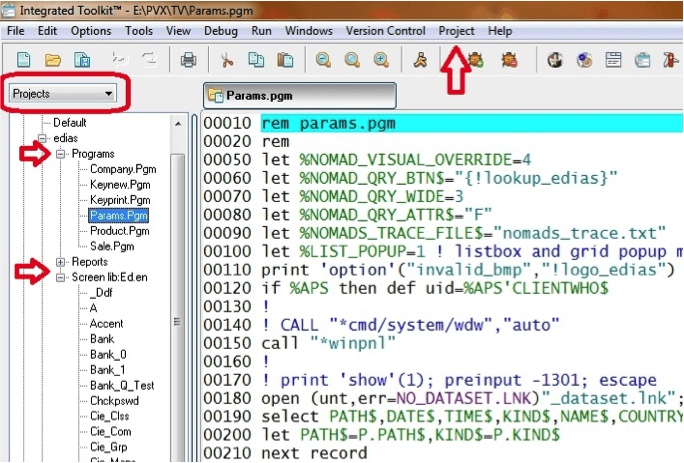
Also in ‘IT’ , the program editor, a lot has changed.

The ‘workspaces’ from the past are now called ‘projects’.

Here too you can see all the items from all projects available. So also Nomads panels and others.

techtip-june2015-US-6

In summary: It pays to take a closer look at this new IDE method. It saves you a lot of time as a developer.

Techtip 1:             PxPlus version 2014 (v12) Windows activation

From this version, the ACTIVATE.PVX file is placed in the ‘PXPKEYS’ directory, 1 directory above where PxPlus was installed. For example, When PxPlus is installed in the standard “C:\PVX Plus Technologies\PxPlus 2014” directory, the activation will then be placed in the “C:\PVX Plus Technologies\PxpKeys” directory. As a result, the activation is no longer a part of a specific PxPlus version, and different PxPlus versions can (simultaneously or not) make use of this activation.

You van always refer to a specific activation by using: ActivationKey=path_to_directoy_with_activate.pvx in the [Config] from the INI file,

for example:

[Config]

ActivationKey=D:\PxPlus\pxpkeys

When you upgrade an existing Windows PxPlus version to v2014 and there is a lib\keys directory (from an older installation), then the v2014 will still be using this activation and will not create a ‘pxpkeys’ directory. Also Unix and Linux v2014 versions will still be using the activation in the lib directory (regardless of whether it was upgraded or a new installation).

PxPLUS simple Client/Server

PxPLUS has developed an alternative for *NThost/*NTslave. The advantage is that the host needs only 1 tcp socket. That is interesting if you connect via the Internet and thus you need to open only 1 port in your firewall.  PxPLUS uses port 4093 by default. They obtained this portnumber by IANA (Internet Assigned Numbers Authority).

To start the host.

Save this script in /usr/local/bin/starthost on your Unix machine:

#!/bin/sh
PVXLIB=/pxplus/lib
PVXFLMAP=\\/
export PVXLIB  PVXFLMAP
umask 0
cd /pxplus
{su username}
/pxplus/pxplus -dr=/pxplus/ \*plus/cs/host -arg 4093 {forced program} >/dev/null </dev/null 2>&1

and change permissions with  ‘chmod 777’

Add this line to /etc/inittab of the Unix machine:

pxp1:2345:respawn:/usr/local/bin/starthost </dev/null >/dev/null 2>&1

[ Note for SCO OpenServer 5 users: I usually include this line below the ‘r3’ line in /etc/inittab ].
Please note that when the kernel environment is rebuild (after linking a new kernel for example), SCO will remove this line from /etc/inittab.

Save /etc/inittab and enter ‘telinit q’. You’ve now started a PxPLUS host program on your Unix machine (using socket 4093) that will wait for *plus/cs/CLIENT  WindX connections.
Please note that on some Unix machines, you will need to reboot in order to have Unix accept this additional inittab line.

If you are using a Linux OS, you will notice that the inittab file is not in use anymore.
In order to have the script autostart when the machine boots, you can use one of the following:

1. There’s a /etc/init.d/boot.local script.

Add the following line to that script:

sudo -uuser /usr/local/bin/starthost &

2. There’s a /etc/rc.d/rc.local script.

Add the following line to that script:

su user -c /usr/local/bin/starthost &

‘user’ is a login name from ‘/etc/passwd’:
This user (or the one that you select) *MUST* be available in /etc/passwd. Verify that you can login and start PxPLUS with this user.

If you want to start the host automatically (as a service) in a Windows environment, use *plus/cs/service. This program asks for a starting directory, tcp port and which program to start.  Then you need to go to ‘control panel’ > ‘services’ and change the status from ‘manual’ to ‘automatic’.


To start a client

Create the following shortcut on your Windows desktop to make a WindX connection:

Target : C:\pxplus\pxplus.exe *plus/cs/client -id=Txx -arg xxx.xxx.xxx.xxx[;ssss] [progname]
Start in: C:\pxplus
Minimized

xxx.xxx.xxx.xxx  is the IP-adres of the host machine.

ssss is the socket number the host is using.  Default=4093

-id=Txx is the value of FID(0)

progname  is the name of the program to start when a connection is established. If empty, PxPLUS starts in ‘console mode’.

If you want to start PxPLUS sub-processes from this kind of connection, you still can use CALL “*windx.utl;spawn”.


Dealer Key

Besides to protect your programs with a password, there is also the possibilty to protect your application with a Dealer Activation Key.  When the activation file contains the correct key that corresponds to the dealer number, stored in  your program, only then your programs will be executed.  To be able to generate such a key, you need to buy a ‘dealer key kit’, and it consists of 3 items:

1) You will receive a key generator program with which you will be able to generate your own dealer keys.  (an executable for 13/32 bit and a DLL for 32/64 bit environments)

2) You will also get an identification file.  This (small) file is used by the generator to create a unique key.  You may never change this file once you started generating dealer keys.

The key generator can produce 2 kind of keys:  developer keys and runtime keys.

  • A developer key is used on the developing computer to be able to SAVE, EDIT and LIST your programs.
  • A runtime key is used on the end-users computer to run the software that is protected with a dealer key.    During the this process, one can add extra options to the runtime key to enable LIST and/or EDIT.

The keys are based on the ‘system id’ of the machine and are therefore different for each computer.

3) You will also be assigned a unique package number.   To add the above keys to the activation file, you use the normal activation program:  pvxwactv.exe (windows) or pvxactv (linux/unix).

After the activation is done with the ‘dealer key’ package, programs kan be saved and protected with the command  SAVE “program”,OWN={unique package number}.   If you want to protect all of your programs with the dealer key, you can set parameter ‘OW’={unique package number}.  Now, every program gets the dealer key when it’s saved, even if you save it without the OWN option.

The developer also has the ability to assign 25 different flags, and each of them can be added to a program by means of  SAVE “program”,OWN={unique package number},FLG={1{:2{:3{:…..{:25}}}} }. For example, programs from the group ‘general ledger’ can be assigned FLG=1.  Programs from the group ‘account payable’ can be assigned FLG=2, etc…  Only runtime licenses generated with the correct flags can execute these programs.  ie. A runtime license, activated with flags 1:3, will not be able to run a program saved with FLG=2.

For information about the price, please contact our sales department.

ODBC 64-bit and 32-bit drivers

1) There are two types of ODBC connections supported by the PxPlus ODBC workstation driver

a) A simple client connection whereby the ODBC driver runs on the workstation and directly accesses the files as either local files or mapped drives.

b) A server connection whereby the ODBC driver connects to a server on another machine which in turn accesses the files.

2) We supply workstation drivers in either 32 bit or 64 bit form.
The 32-bit driver can be installed and used on either a 32 bit or 64 bit Windows system.
The 64 bit driver can only be installed on a 64 bit Windows system.

3) The 32 bit workstation driver can only be used by a 32 bit application and the 64 bit workstation driver can only be used by a 64 bit application.
NOTE: Microsoft still recommends that users install 32 bit Office regardless of whether the Windows system is 32 or 64 bit.
See: http://office.microsoft.com/en-us/products/office-2010-frequently-asked-questions-HA101674631.aspx#About_Office_2010_4

4) By default, the Windows ODBC configuration utility will ONLY recognize drivers of the same type as the Windows OS. That is the Windows ODBC configuration utility on a 64 bit Windows system will only allow access to 64 bit workstation drivers. To configure 32 bit ODBC drivers on a 64 bit Windows system you must use the ODBCAD32.exe program found in the windows SYSWOW directory.
NOTE: That to make this easier, when installing the current PxPlus 32 bit driver on 64 bit systems, we automatically create a shortcut to the proper configuration utility for the user.

5) When connecting to a server (‘b’ in item 1 above), the type of workstation driver (32 or 64 bit) is immaterial to server just as the type of server is immaterial to the workstation driver. All communication between the two is over the network using TCP/IP thus the type of client or server does not matter. Simply put, a 64 bit workstation driver can connect to a 32 bit server and a 32 bit workstation driver could connect to a 64 bit server (if one existed).

ODBC Driver – What it is – What you need – How to activate

The PxPLUS ODBC driver allows access to PxPLUS data files from any Windows product that supports an ODBC interface. The PxPLUS ODBC driver is a Windows only product, which means that the driver can only be installed in a Windows environment. Depending on where the data is located, you will either need a PxPLUS Local ODBC driver or a PxPLUS Client ODBC driver.

If the Windows PC on which you will install the ODBC driver has direct access to the PxPLUS data files through either a local drive or a mapped network drive, you can install the ‘Local’ ODBC driver. Note that this product must be activated on each PC it is installed on. If the PxPLUS data is located on a server that doesn’t allow you to map its drive (say for example a Unix server), you will need to install a PxPLUS ODBC Server on the server and a PxPLUS Client ODBC driver on each PC that needs to access that server. In this scenario, only the PxPLUS ODBC Server needs to be activated – the PxPLUS Client ODBC drivers don’t require activation at all (just like a WindX Plugin doesn’t need to be activated and gets its activation from the server).

Note that if a Local ODBC driver is accessing data on a networked drive, the performance can be less than optimal (due to the amount of data that will be transferred across the network). You can decrease the network traffic by installing a PxPLUS ODBC Server on the machine that hosts the data (provided that machine is running an operating system that is supported by the PxPLUS ODBC Server – please visit our ODBC download page for a list of supported operating systems).

Activation of the PxPLUS ODBC Local driver and/or PxPLUS Windows ODBC Server is quite easy: during installation of these products, the installer will ask for a serial number, user count and activation key. If you are installing at a site that is running a PxPLUS Professional or E-Commerce license, the serial number, user count and TEMPORARY activation key of that product must be entered in the activation dialogue (don’t worry – although you are entering a temporary key, the product will activate permanently). In case the site is using a PxPLUS Base license or no PxPLUS license at all, you need to contact EDIAS Sales and either order an ODBC Local Driver or ODBC Server serial number and activation key.

ODBC v5.xx needs a PxPLUS v10 key or higher.

ODBC v4.xx needs a PVX v9, v8 or v7 key.

The PxPLUS Windows ODBC Server can also be activated from the Windows Control Panel by starting the ‘PxPLUS File Server Settings’ wizard and selecting the ‘Activation’ tab.

A Linux/Unix ODBC Server must be activated by manually changing the ‘pvxiosvr.conf’ file in the directory where the ODBC Server was installed. You should start by copying the ‘pvxiosvr.conf.sample’ file to ‘pvxiosvr.conf’. In the ‘.conf’ file, one must create a new line that uses this syntax: serial=serno-usercount-actkey (for example: serial=12345-5-ABC0123456789DEF). The serial number, user count and activation key are (just like with the Windows ODBC Driver/Server) the serial number, user count and TEMPORARY activation key of the PxPLUS Professional or E-Commerce license that is running at that site. In case the site is using a PxPLUS Base license or no PxPLUS license at all, you need to contact EDIAS Sales and order an ODBC Server serial number and activation key.

Note:  On a Windows 64bit OS, the 32bit ODBC administrator is needed, and can be found as C:\windows\syswow64\odbcad32.exe

How to setup JavX on a PDA

You will need a J2ME Personal Profile Java Runtime Environment on your PDA in order to start JavX. If you already have such a JAVA version installed, you can skip the downloading and installing of the IBM WebSphere Java as explained below.

To install IBM WebSphere Java on your PDA, you must download that Java version from this site and store it on your DESKTOP PC.
(Click on ‘Download Trial’).

Then connect your PDA to your desktop PC and start the Microsoft ActiveSync application. Install the IBM Java you just downloaded on both your desktop and PDA.

I assume you know that the PDA must be a wireless client. If not, you can stop right now.

Okay, you’ll need the Direxions 2005 CD. Put that CD in your desktop PC and install both ‘PxPLUS v7 for Windows’ and ‘JavX v2.5 Developers Kit’ on your desktop PC. Make sure you still have an ActiveSync connection between the PDA and the desktop PC. Start PxPLUS V7 and go to the directory (CWDIR) where you installed the ‘JavX v2.5 Developers Kit’. Underneath that directory, there should be a ‘JavXPDAWiz’ directory. Use CWDIR to switch to that directory. Then enter RUN “JAVX.PGN”.

A graphical window should appear in which you must enter the IP address of the nthost or application server. Also enter the socket number that nthost/appserv is using and select if your server is running nthost or the application server. Then click NEXT.

In the next window, it will say that JavX will be installed in the \JAVX directory and that the program will create a shortcut in the PROGRAMS group of your PDA. You need to click INSTALL here. If you get a ‘NOT ON CRADLE’ error message, select ‘Device Information’ from the menu, close that window and try INSTALL again.

JavX will now be copied onto the PDA and a JavXAE shortcut will be created in your PDA Programs group. The next window will display some registry settings, you need to click INSTALL here as well. Then click EXIT to leave the installer.

You can now disconnect the PDA (close ActiveSync). Click Start/Programs (on your PDA). There should be a JavXAE icon. Click that and JavX will try to connect through the wireless TCP connection to your nthost/appserv server.

Now, in case you are NOT using an English/US Windows OS on the PDA, or in case your are NOT using the IBM WebSphere Java, you need to execute the following step to fix a path problem in the JavXAE link that was created on the PDA:span>

Connect the PDA to your Desktop and start ActiveSync. Use Explorer to browse the PDA and go to the \windows\start menu\programs directory (or whatever it is called in a On-US Windows Mobile OS) . Copy the JavXAE link into a directory on your Desktop PC and open it there with NOTEPAD (start Notepad and use the File/Open menu item to open it). It will probably look something like this:

109#”\Program Files\J9\PPRO10\bin\j9.exe” “-classpath” “\JavX\JavXAE.jar” “-jcl:ppro10” “localNetworkClientTest” “server=192.168.2.102; port=20000; guifactoryclassname=AWTGUIManagerFactory”

Now change the \Program Files\ path to the correct path where IBM J9 is installed. Save the changes, and drag the link file back into the PDA \windows\start menu\programs directory. Disconnect the PDA and try to start the JavXAE link.

Window’s Printer Mapping to a PxPLUS Device Driver

A new feature has been added in PxPLUS v6.10, where a Windows Printer may be defined on a PC so that it appears in the Windows Printer Selection Dialogue, and if that printer is selected from within a PxPLUS session, then PxPLUS attempts to re-route the printer to a device driver.

This allows Developers to create Windows Printer’s on workstations for items such as the Preview, PDF, or HTML output from PxPLUS.

This feature works based on the name and properties of the printer.

  • The printer must have an output port of “NUL:”
  • The second word in the Printer’s Name, will be parsed out and an underscore will be added to the beginning and end of the name. The PxPLUS LIB directory will be scanned for a device driver that matches this name. If the device driver is not found, then the printer will not be mapped anywhere, and will simply output to NUL.EXAMPLE:
    Printer Name:   “PxPLUS Viewer”
    A search of the PxPLUS Lib Directory for “_viewer_” will be made.EXAMPLE:
    Printer Name:   “PxPLUS PDF”
    A search of the PxPLUS Lib Directory for “_pdf_” will be made.

Follow the next steps to add such a Printer to a Windows XP Workstation:

  1. Go to Window’s Printer’s and Faxes.
  2. Select “Add a printer”.
  3. Select “Local printer”.
  4. Check the “Use the following port” for an entry of “NUL:”.
    if “NUL:” exists, select it and go to Step 8.
  5. Select “Create a New Port”.
  6. Set the “Type of Port” = “Local Port”.
  7. For “Port Name” enter “NUL:” (without the quotes).
  8. From the manufacturer / printers dialogue, select “Generic” for a manufacturer and “Generic/Text Only” for the printer.
  9. Select “Keep existing driver”
  10. Enter a name for your printer, keep in mind, that the 2nd word in the name is what must match the device driver.
    For this “Printer Name”, enter “PxPLUS Viewer”
  11. For the “Set as default printer”, select “No”.
  12. For “Sharing”, select “No”.
  13. For “Print a test page ?”, select “No”.
  14. Check your settings and Select “Finish”.

You should now have a printer named “PxPLUS Viewer” as one of this workstation’s printers.From within any PxPLUS application, you will see this printer in the *WINPRT* printer selection dialogue. Whenever this printer is selected, PxPLUS will re-route the printer to the specific device driver.

In the case of our example, we have created a printer named “PxPLUS Viewer” which is connected to “NUL:”. If selected from Printer Selection, PxPLUS will automatically close “*WINPRT*” and open the file “*VIEWER*” instead.

NOTE: This will ONLY work in PxPLUS applications!
If the user selects one of these special PxPLUS mapped printers from another application (Word, Notepad, etc.), they will get NO output.

How to hear ‘RING BELL’ in Windows XP.

Follow these steps to hear the audible bell (‘RB’) in Windows XP.

  • Add a new key in the registry. \HKEY_CURRENT_USER\AppEvents\Schemes\Apps\.Default\.Default
  • Start ‘Control Panel’ > ‘Sounds and Audio Devices’ Select the ‘Sounds’ tab and search for the Windows ‘Default Beep’ line in the listbox. Select your preferred .wav file. (i.e. ding.wav)
  • Turn on your speakers.
  • Start PxPLUS in console mode and type PRINT ‘RB’ or hit the [BackSpace] key.

How PxPLUS finds and saves your files and programs

First thing to know are the verbs, functions and parameters that are necessary to understand the search rules of PxPLUS.

‘CD’ parameter.
The ‘CD’ parameter is default ‘OFF’, which means the current directory is searched after the PREFIXes. If set to ‘ON’, PxPLUS checks the current directory before checking the PREFIX list for a file.
(see below for ‘Search Rules’)

You can check the value of the parameter by using : PRINT PRM(‘CD’)
and you can set the parameter by using: SET PARAM ‘CD’=1 (or 0)

PREFIX
You can compare the PREFIX with the PATH variable in MS-DOS or UNIX.
Use the PREFIX directive to define a series of search paths to be inserted in front of all relative file references used in OPEN / LOAD / RUN / CALL / PERFORM directives.
(PxPLUS OPENs files with absolute paths directly, without performing a search.)
Example:
PREFIX “/usr/mydir/data/ /usr/mydir/prog/ /usr/mydir/sub/ D:/other/data/”

Different paths must be separated by a space.
As you can see, you can add a drive letter before a directory, to indicate to search a different drive than specified with the SETDRIVE verb.

You can specify up to 10 differently numbered PREFIXes, i.e. PREFIX (0) through PREFIX (9).
Example:
PREFIX (0) “/usr/mydir/data/”
PREFIX (1)”/usr/mydir/prog/ /usr/mydir/sub/”
PREFIX (2)”D:/other/data/”

The advantage is that you can DISABLE and ENABLE a specific PREFIX.
i.e.: DISABLE 2, disables the search in D:/other/data/.

PREFIX (0) ” … ” is the same as PREFIX ” … ”

If you need to include a space within a directory name, then that directory location must be enclosed in double quotation marks.
For example:
PREFIX “C:/Tmp/ C:/usr/ “”C:/Program Files/”””

PRINT PFX or PRINT PFX (n) prints the value of the PREFIX.

EQUALS signs for special matching.
Equals signs in your PREFIX have special meaning. Each character of the filename that corresponds by position to an equals sign will be used to form a subdirectory name to be used in the search. For instance, if you include 1 equals sign, PxPLUS will interpret that to mean that the first character of your filename is also the subdirectory name. If you include 2 equals signs, it will take the first 2 characters as matching the subdirectory name, and so on.
The purpose was to split up large directories, inherited from other Business Basics, into smaller ones for faster access and better management.

Example:
Suppose your application consists of more than one module. The program name indicates to which module they belong. i.e. GL001 GL002 GL003 belong to the module ‘General Ledger’ and AR001 AR002 … belong to the module ‘Account Receivable’. Then you can split your directory into separate subdirectories. The name of these subdirectories must be the same as the first corresponding characters of the module, in our example GL and AR.
When looking for a program or file, PxPLUS evaluates the initial two characters as matching characters and uses them as the name of the subdirectory where the search will commence for relative file references.
For example:
PREFIX “/myapp/==/”
OPEN (1)”ARHIST”
PxPLUS evaluates the filename ‘ARHIST as /myapp/AR/ARHIST for purposes of the initial search.


Asterisks as PREFIX Wild Cards.
You can also use * and ** as wild-card characters to support the use of filename extensions without modifying your code. This feature was added to the PxPLUS language as of Ver. 4.20 primarily for WINDOWS 2000 users, since the Microsoft Certification rules for WINDOWS 2000 require that all files have file extensions. With the wild-card characters, you can rename your files on disk with a common file extension without modifying your program code.

Using a single asterisk (*):
If your PREFIX directive includes an asterisk plus a specified extension as a filename, PxPLUS inserts the filename from your OPEN command in place of the asterisk and searches first for your filename with the extension you specify in the PREFIX.
For example:
PREFIX “/mydir/*.dat”
OPEN(1)”customer”
PxPLUS will scan the disk for “/mydir/customer.dat” and OPEN that file if found. If ‘customer.dat’ is not found, PxPLUS will attempt to find and OPEN a file named “customer”.

Note!
KEYED “abcde”,5 will not create a file named “abcde.dat” , but
ERASE “abcde” will erase a file named “abcde.dat”!


Using two asterisks (**):
If your PREFIX directive includes two asterisks plus a specified extension as a filename, the substitution described above for a single star will occur only if your OPEN directive includes a simple filename (i.e., a filename without an extension). If your filename is complex (e.g. customer.hist), no substitution occurs.
For example:
PREFIX “/mydir/**.dat”
OPEN(1)”customer”
OPEN(2)”customer.hist”
Since OPEN (1)”customer” contains a simple filename, PxPLUS will look first for “/mydir/customer.dat”, then, if not found, for “customer”.
Since ‘customer.hist’ is a complex filename and two stars are used in the PREFIX filename, PxPLUS doesn’t add a .dat extension to customer.hist when it executes the search to find and OPEN the file.

PREFIX PROGRAM
Use the PREFIX PROGRAM format to define the search location(s) PxPLUS will search first when it attempts to LOAD, RUN, CALL, PERFORM or SAVE programs.
For example:
PREFIX PROGRAM “/pvx/mydir/pgm/”

to examine this prefix :
PRINT PFX(PGN)

PREFIX FILE
This is not the counterpart of PREFIX PROGRAM !

Use the PREFIX FILE format to do dynamic translations of filenames in your applications by defining a KEYED file as a lookup table. Any file you define as a PREFIX FILE must be a variable-length KEYED file or PxPLUS returns an Error #17: Invalid file type or contents.

If you define a PREFIX FILE, then PxPLUS searches this special KEYED file for a search location whenever it encounters an OPEN command with a relative filename, using the filename in your OPEN directive as the key to the PREFIX FILE. (Reminder: PxPLUS OPENs filenames with absolute paths directly, without performing a search.) The normal PREFIX search rules still apply after a filename has been located in the PREFIX FILE.

When you write to this special KEYED file, treat the filename from your program’s OPEN command as the KEY. The data record for each key contains the true filename you want opened instead. (PxPLUS retrieves the data record internally with a READ RECORD.)

Example:
KEYED “fileprefix.dat”,25
OPEN(1)”fileprefix.dat”
WRITE RECORD(1,key=”customer”)”[odb]ACCESS;CUST;KEY=CUSTNO”
CLOSE(1)
……
PREFIX FILE “fileprefix.dat”
OPEN(1)”customer” ! Internally this becomes
>> OPEN(1)”[odb]ACCESS;CUST;KEY=CUSTNO”

So you don’t have to change anything in your programming code, to alter your type of database. You only have to prepare the keyed file from the PREFIX FILE.

As of version 4.23, a second field is allowed in the keyed file for PREFIX FILE. This is an OPTIONS field. These OPTIONS are put into the OPT= for the OPEN of the real path/filename. The above enhancement allows an OPT= on the original OPEN, where the additional OPT= is appended to any of the options from the second field of the PREFIX FILE record.

Example:
PREFIX FILE contains the following:
Key=”GLMAST”, DATA RECORD=”[ODB]DSN;TABLE”+sep+”KEY=field1″

If you OPEN(chan)”GLMAST”
internally PxPLUS will:
OPEN(chan,OPT=”KEY=field1″)”[ODB]DSN;TABLE”

If you OPEN(chan,OPT=”REC=somedata”)”GLMAST”
then internally PxPLUS will:
OPEN(chan,OPT=”KEY=field1;REC=somedata”)”[ODB]DSN;TABLE”


You can obtain the PREFIX FILE value by using PRINT PFX(-1).

SEARCH RULES
The PxPLUS default is to search all prefixes, in the following order:

For OPEN directives.
1) PREFIX FILE, if set. (Replaces pathname then continues sequence)
2) Current Directory (if ’CD’ parameter is set)
3) PREFIX 0 to 9
4) PROGRAM PREFIX, if set
5) Current Directory (if ’CD’ parameter is not set)

For LOAD / RUN / CALL / PERFORM / SAVE directives.
1) PREFIX FILE if set (Replaces pathname then continues sequence)
2) Program Cache
3) Current Directory (if ’CD’ parameter is set)
4) PREFIX PROGRAM if set
5) PREFIX 0 to 9
6) Current Directory (if ’CD’ parameter is not set)


The PREFIX search rules apply not only to files being found, but also to files being created. PxPLUS creates files in the first location that is permitted by the PREFIX rules. If ’CD’ (Search Current Directory) parameter is set, then all files are created in the current directory (the first permitted location). If the ’CD’ parameter is not set, then PxPLUS creates your file in the first location permitted by the search rules above.
You can use the ENABLE and DISABLE directives to control which of the numbered prefixes PxPLUS will use in the search. (While scanning PREFIXes 0 to 9, PxPLUS ignores any PREFIX that is DISABLEd.)
Note that the initial check for PROGRAM cache checks for a match against the original file names. Thus, if you used CALL “ABCD” and you had previously loaded a program with the same name, PxPLUS would use the one in cache. This eliminates the directory searches involved, but if you have duplicate program names in your system, it is possible to get the wrong one, for instance, if you CALL “ABCD” and then change your directory / prefix and re-CALL “ABCD”. If this happens for duplicate program names in your system, either clear the CACHE or don’t use it.

PERFORMANCE
Another thing you should avoid is to add the drive letter in front of the pathname if the current drive is the same as the drive letter in the PREFIX.
SETDRIVE “C:” ! mostly this is the default
PREFIX “C:/myapp/data/ C:/myapp/files/ D:/mydir/somedir/ C:/pvx/lib/”

Better is :
SETDRIVE “C:”
PREFIX “/myapp/data/ /myapp/files/ D:/mydir/somedir/”

First, you don’t need /pvx/lib in your searchpath. Every PxPLUS utility or PxPLUS subdirectory can be found using the * prefix. i.e. CALL”*web/email”
Second, by leaving out the drive letter, PxPLUS doesn’t have to check if the drive exists, and thus you’ll have a big performance gain.
If possible, put the path with a different drive letter at the end of the search path.

How to convert to PxPLUS

There are different ways to convert your ‘Business Basic’ software. Once you’ve installed PxPLUS , you find 4 specific directories under \pvx\lib\ that are necessary to convert from another BASIC.
These are :

Thoroughbred directory : _conv.tbd
Mai OpenBasic directory : _conv.ob
BBx / PRO5 directory : _conv.bbx
MicroShare Basic directory : _conv.msb

In the HELP-files, you can read all about the older conversion programs. But, because there are recent developments, which are not documented, I’d like to explain these new tools.

GUI_CV
This program converts BBx programs and files, without the need of a BBx (or PRO5) executable.
It has a fully graphical interface.
The next items can be turned on or off :

  • testconversion
  • write in log file :
    • name of program or file.
    • a program statement that contains $0A$.
    • a file containing non-ASCII characters.
    • a filerecord containing non-ASCII characters.
    • warnings.
  • append to log file or not.
  • variable length records or not.
  • files with a maximum number of records or not.
  • convert string files or not.
  • field separator is $0A$ or $8A$.
  • OEM to ANSI conversion in programs.
  • OEM to ANSI conversion in files.

CV_NOBBX
This is a non-graphical conversion program. The interface is the same as the
standard CV program. Major advantage : You don’t need a BBx executable !

CONVDATA.BBX
In directory *TOOLS, there is a new tool called convdata.bbx.
Besides DIRECT, SORT and MKEYED files, it converts also INDEXED files.
No BBx executable needed !

READ BBx files
Since version 4.20, you have the possibility to read BBx files from within PxPLUS . To write to them is not possible.
Your PxPLUS must be activated with a special ‘package key’ : 20010.

LOADBBX
This is a ‘console mode’ command to load and convert a BBx program into memory. From then on, you can EDIT, LIST and SAVE it, just like any other PxPLUS program.
You can find this ‘command’ in the *cmd directory.

Syntax: LOADBBX str1{,RAW}    (pay attention to the ‘space’ just after LOADBBX)

‘str1’     (path+)name of a BBx program file.
‘RAW’     don’t convert verbs/functions to PxPLUS format.
pay attention : user_lex settings still apply.

BBx, PRO5, and VPRO5 are registered trademarks of Basis International.
ProvideX is a registered trademark of Sage Software Canada Ltd.

Performance Problems with WindX ?

If your WindX to Unix connection is actually executing a Unix ‘login’, read on. This document explains how you can improve WindX performance by NOT using the standard Unix login mechanism.

When WindX is used through a telnet connection (which is the ‘normal’ way of connecting a LAN client to Unix), both sides (WindX and PxPLUS on the host) constantly need to translate all data. That’s because certain characters from the 256-byte ASCII table have a special meaning to telnet itself, and WindX must avoid using these characters. This translation of data in both directions (host to WindX and WindX to host) can cause a noticeable performance penalty.

There is another way of connecting a Windows WindX client to a Unix host. All programs that are required to connect WindX to the Unix host without using a Unix login (the PxPLUS *nthost and *ntslave programs) are already bundled with PxPLUS and WindX.

Below you will find a description of how to set up this ” *nthost/*ntslave ” connection between host and WindX. This type of connection doesn’t use telnet and should make quite a performance difference.

Please note that all IP addresses and paths are only examples and must be replaced by values that reflect your installation.

Save the script below in /usr/local/bin/starthost on your Unix machine:

#!/bin/sh
PVXLIB=/pvx/lib
TERM=winterm
PVXSTART=*startup # or whatever your PVXSTART normally uses
export PVXLIB TERM PVXSTART
umask 0
cd /pvx
/pvx/pvx \*nthost -arg 20000 user 0 >/dev/null </dev/null 2>&1

Use ‘chmod 777’ to set ‘rwx’ permissions for all on the /usr/local/bin/starthost script.

‘20000’ is the socketnumber of the host process that will be monitoring for WindX programs to connect.

‘user’ is a login name from ‘/etc/passwd’:
This user (or the one that you select) *MUST* be available in /etc/passwd. Verify that you can login and start PxPLUS with this user.
All WindX users will appear (in Unix) as THIS user (in other words: the PxPLUS WHO function will return this name).

In /etc/inittab on your Unix machine, enter the following line:

pvx1:2345:respawn:/usr/local/bin/starthost </dev/null >/dev/null 2>&1

[ Note for SCO OpenServer 5 users: I usually include this line below the ‘r3’ line in /etc/inittab ].
Please note that when the kernel environment is rebuild (after linking a new kernel for example), SCO will remove this line from /etc/inittab.

Save /etc/inittab and enter ‘telinit q’. You’ve now started a PxPLUS host program on your Unix machine (using socket 20000) that will wait for *NTSLAVE WindX connections.
Please note that on some Unix machines, you will need to reboot in order to have Unix accept this additional inittab line.

If you are using a Linux OS, you will notice that the inittab file is not in use anymore.
In order to have the script autostart when the machine boots, you can use one of the following:

1. There’s a /etc/init.d/boot.local script.

Add the following line to that script:

sudo -uuser /usr/local/bin/starthost &

2. There’s a /etc/rc.d/rc.local script.

Add the following line to that script:

su user -c /usr/local/bin/starthost &

When you want to start NTHOST under Windows ‘as a service’ , you can use this example:

0010 BEGIN
0020 LET SRV_NAME$=”PVX.nthost.Test”
0030 LET DSP_NAME$=”PxPLUS NTHOST Server”
0040 LET START_TYPE=1 !  1=auto, 2=manual, 3=disabled
0050 LET CMD_LINE$=”*nthost -arg 20000 -K host”
0060 LET TMP$=ARG(0),P=POS(“/\”:TMP$,-1); IF P=0 THEN ESCAPE
0070 LET START_DIR$=TMP$(1,P) ! The starting directory
0080 LET DESCRIP$=”PxPLUS Nthost server on socket 20000″
0090 ! Now install the service
0100 LET SERVICE=NEW(“*obj/ntservice”)
0110 PRINT “Now installing the service…”
0120 LET RESULT=SERVICE’CREATEPROVIDEXSERVICE(SRV_NAME$,DSP_NAME$,DESCRIP$,CMD_LINE$,START_DIR$,START_TYPE,””,””,0)
0130 DELETE OBJECT SERVICE


On your workstations (that are running WindX), create the following shortcut:

Target: C:\Pvx\Pvxwin32.exe *ntslave -ID=T99 -arg 192.2.9.10 “” 20000
Start in: C:\Pvx
Run: Minimized

192.2.9.10 is the IP address of your Unix machine.

20000 is the socket number of the host process, as defined in /usr/local/bin/starthost.

-ID=T99 is the FID(0) value of PxPLUS on the Unix machine.

“” is the name of the program that should be started once a connection has
been made. When empty (“”), PxPLUS will start in console mode.

If you want to start PxPLUS sub-processes from this kind of connection, you should use CALL “*windx.utl;spawn” as the START verb will not work in this case.

WebServer License

There seems to be some confusion about the licensing of the PxPLUS WebServer.

You now have 2 possibilities to activate the PxPLUS WebServer:
– Buy the PxPLUS WebServer ‘add-on’ package. (package 20002)
or
– Buy the PxPLUS ‘E-Commerce’ Bundle, which includes the WebServer, plus many more things. (See pvx_bundles.htm )

The number of users your PxPLUS is activated for, is equal to the number of Task Handlers of the WebServer.

What’s a PxPLUS WebServer Task Handler ?
How many such Taskhandlers do you need ?

Well, every time the WebServer is requested to do *anything*, the request is handed over to a Task Handler for execution.
With a single user license of PxPLUS (or a single user E-Commerce bundle), the WebServer has one (1) Task Handler. This Task Handler will handle each and every one request sequentially.
Only after the 1st request has been handled (or has timed out), the Task Handler will start handling the 2nd request. And so on.
In other words, a request will only be executed as soon as the Task Handler has finished processing the previous request.

If you have a license for 2 Tasks, the WebServer will (probably) give the 1st request to the 1st Task Handler and the 2nd request to the 2nd Task Handler. The first Task Handler to end handling the request will then receive the 3rd request to handle. And so on.
In other words, Task Handlers run parallel. The more Tasks you have licensed (activated), the more likely that waiting requests will be served faster.
When the WebServer is started, it will automatically start the number of Task Handlers which you have configured (activated). These Task Handlers will sit and wait until the WebServer hands them something to do.

PxPLUS and ASCII-text files

PxPLUS has 9 ways to write to string files.
There are 3 ways to OPEN the file:

  • OPEN (1) FILE$
  • OPEN (1,ISZ=1) FILE$
  • OPEN(1,ISZ=n)FILE$, where n>1.

And there are 3 commands to fill it:

  • PRINT
  • WRITE
  • WRITE RECORD

It depends on the combination you use, what PxPLUS will append to each record.

OPEN (1) OPEN (1,ISZ=1) OPEN (1,ISZ=n) n>1
PRINT 0D0A 0D0A 0D0A000000…
WRITE 8A0D0A 8A 8A0000000000…
WRITE RECORD 0D0A Nothing 000000… till LEN=n

So if you want that nothing gets appended to your data, you have to OPEN your file with option ISZ=1 and use WRITE RECORD to write the data.


  • OPEN (1)

PxPLUS does a pre-scan on the first line of a serial file. When a character is found outside the range of a ” ” (space) through a “~”, PxPLUS considers the file a binary file and then the rules of ‘OPEN (1,ISZ=1)’ apply.

You will have to LOCK the file before you can write to the file.
PxPLUS will handle the file in a record oriented way.
The IND() function returns the current record number.

  • WRITING

PxPLUS will always append $0D0A$ (1)to the end of a record.
In case of a WRITE verb, an extra field separator ($8A$) (2) will be appended, before the record separator ($0D0A$)

  • READING

A ‘READ RECORD’ scans the data in the file for a $0D0A$ byte combination.
A ‘READ’ implies a ‘READ RECORD’. The data from the ‘READ RECORD’ is then parsed into the variables, where $8A$ acts as fieldseparator.
A ‘READ (1,IND=n)’ reads the n+1th record.

1 Record Separator
If running under Windows, the record separator is $0D0A$
When running under UNIX, the record separator is $0A$
In my examples, $0D0A$ is used.

2 Field Separator
The default field separator is $8A$, but can be changed to something else with the ‘FS’ parameter.


  • OPEN (1,ISZ=1)

Opening a file with ‘,ISZ=1’, opens the file in BINARY mode, even if you open a KEYED file with ‘,ISZ=1’, PxPLUS will treat the file as if it was a binary file.
For compatibility reasons with other Business Basics, ‘ISZ= -1’ is allowed.
This mode of OPEN, implies a LOCK to the file.
PxPLUS will handle the file in a byte-oriented way.
The IND() function returns the current byte count.

  • WRITING

PRINT X$ writes X$+$0D0A$
WRITE X$ writes X$+$8A$
WRITE RECORD X$ writes X$ and adds nothing to the variable, but if the variable is empty, a $00$ byte will be added.

  • READING

Normally you will read the file with READ RECORD(1,SIZ=nnn)X$
Otherwise, ‘SIZ=1’ is taken.
A ‘READ(1,IND=n)’ reads the n+1th byte.


  • OPEN (1,ISZ=n) where n>1

Watch out for this kind of file access.
Always test your application if you use this kind of approach

  • WRITING

A ‘PRINT’ writes the variable(s) to the file. Each PRINT is terminated by $0D0A$.
Consecutive PRINTs can be performed. No field separator between two fields.
When the n bytes are reached, an ERROR #1 is generated.
When the n bytes are not reached, the rest of the n bytes are filled with $00$
A ‘WRITE’ writes the variable(s) to the file. A field separator ($8A$) will be appended after each field. The rest of the n bytes will be filled with $00$.
A ‘WRITE RECORD’ writes the data to the file. The rest of the n bytes will be filled with $00$

  • READING

A ‘READ’ implies a READ RECORD of n bytes. The data found will be parsed into variables.
A ‘READ RECORD’ reads n bytes (n = specified by OPEN)
A ‘READ RECORD (1,SIZ=x) will read x bytes.

  • Tip: Do not mix PRINT, WRITE, and WRITE RECORD to fill a file.

Summary

  • If you want to fill a serial file with the purpose to merge back the data:

WRITE PROCEDURE

READ PROCEDURE

SERIAL F$
OPEN LOCK (1) F$
PRINT (1)"10 REM"
PRINT (1)"20 BEGIN"
PRINT (1)"30 FOR I=1 to 10"
PRINT ...
PRINT (1)"9999 END
CLOSE (1)
OPEN (1)F$
MERGE (1)
  • If you want to have full control:

Fe. : You have to prepare a file for someone else to read.
They impose a certain format: the record must be 128 chars long, plus a ‘TAB’ (hex09) as separator.

WRITE PROCEDURE

READ PROCEDURE

SERIAL F$
OPEN (1,isz=1) F$
DIM X$(128)
X$(1)=SOME_CODE$
X$(25)=OTHER_STUFF$
...
X$=X$+$09$
WRITE RECORD (1)X$
...
OPEN(1,isz=1)F$
GET:
READ(1,siz=129,end=DONE)X$
GOTO GET
DONE:


  • If you want to write variables to a serial file with the purpose to read them back in:

WRITE PROCEDURE

READ PROCEDURE

SERIAL F$
OPEN LOCK (1) F$
PUT:
A$= ... , B$= ... , C$= ...
WRITE (1)A$,B$,C$
GOTO PUT
OPEN (1) F$
GET:
READ(1,end=DONE)X$,Y$,Z$
GOTO GET
DONE:


Sample program

0010 BEGIN ; PRINT 'CS','SB'
0020 FOR I=1 TO 2
0030 LET F$="c:\tmp\erase.me"; ERASE F$,ERR=*PROCEED; SERIAL F$
0050 !
0060 IF I=1 THEN OPEN LOCK (1)F$; PRINT "OPEN (1) "
0070 IF I=2 THEN OPEN LOCK (1,ISZ=1)F$; PRINT "OPEN(1,ISZ=1)"
0080 !
0090 PRINT (1)"111"
0100 WRITE (1)"222"
0110 WRITE RECORD (1)"333"
0130 PRINT (1)"444"
0140 WRITE (1)"555"
0150 WRITE RECORD (1)"666"
0160 !
0170 CLOSE (1); OPEN (1,ISZ=1) F$
0180 READ RECORD (1,SIZ=-1000) X$
0190 PRINT 'LF',"Binary file contents: ",'LF','LF','SF',HTA(X$),
0200 !
0330 CLOSE (1)
0331 PRINT 'SB','LF'
0340 NEXT I

Link Files and Device Drivers

What’s a Link File ?

A Link File is just a PVX file to make an ‘ALIAS’-name for a certain ‘device’ or ‘file’, and to connect a Device Driver to it.

A PxPLUS Link File is just a very simple little file, with three components.
– The header that defines it as a PxPLUS Link File.
– The name of some other file to open.
– The name of a Device Driver (call-program) that will be executed when PxPLUS opens that other file. (see Device Driver below)

That’s it… Link Files are just that, little files that exist on your hard disk. Like any other file, they live by the same rules. Meaning that under UNIX a Link File has a filename that is just as case sensitive as any other. Under DOS/Windows the case of the filename is irrelevant.

There are three kinds of Link Files in PxPLUS . Each has a slightly different header, [PVXLNK], [PVXDEV], and [PVXAPR]. Internally PxPLUS will deal with each slightly differently.

Lets talk about the Header for a second.

All PxPLUS Files have a header. Keyed files have [PVXKEY] and Indexed files have [PVXIND].

When PxPLUS opens any and every file, it reads up to 512 bytes out of that file right away. It then checks if it has one of these special headers that begin with “[PVX”. If it finds that the file has one of these headers, then PxPLUS knows that its one of its own files, if it doesn’t… then it’s someone elses, and all of these “other” files get treated as operating system files… like c:\autoexec.bat or win.com or whatever it is.

If its a Keyed file, then PxPLUS treats it like one. The interpreter knows how to read its own file formats.

In the case of a Link File, PxPLUS does something a little different, than it would do with say… an indexed file.

Since the interpreter has read enough bytes (up to 512 right), it has the entire Link File in memory. It then pulls the other 2 characteristics out of this Link File.
#1 – The name of some other file to open. (pos 9,60)
#2 – The name of a program to call (Device Driver). (pos 69,12)

Internally, PxPLUS closes the Link File. Then it opens the ‘other file to open’ and makes sure the name stays the same as the Link File. When it has opened that file, it calls the program (Device Driver). PxPLUS puts a ‘*dev/’ in front of it. So the program named is always called from the ‘lib/_dev’ directory.

Thats all a Link File is and does.

It doesn’t care what its name is… it doesn’t care what the name of the ‘other’ file to open is… it doesn’t care what program it is that you want to call, nor does it care what that program does. When the called program exits, PxPLUS continues running your program at the end of the OPEN()
The only thing PxPLUS cares about is that:
#1 – The ‘other’ file name actually exists and can be opened,
#2 – The program exists in the ‘*dev’ directory and can be read.

You can think of a Link File as an ‘ALIAS’ to another file with a supporting called program if you like.

There is a utility in PxPLUS that helps you to create these Link File, called *UCL.
You can use it to create these files and associate the ‘other’ file name to open and a program with it. Or you can write the file out to the hard disk yourself. Link Files are just little plain text files.

Keep something else in mind. When you open a file and it doesn’t matter what it is, PxPLUS searches for it, opens it, and checks to see if it is one of it’s own files.

When you do: OPEN(1)”SALES” PxPLUS doesn’t care if its a keyed file, or an indexed file or a Link File. It’ll check the header, and take whatever action is appropriate to the info it finds in the header of the file you opened.

I mentioned that there are three kinds of Link Files. [PvxLnk] [PvxDev] & [PvxApr]. These headers cause PxPLUS to take a slightly different action.

The [PVXLNK] is used when you just want the link to point to the ‘other’ file, without calling a program. So you could do something like: move a SALES file to another directory or drive, and create a Link File with the original name (SALES) and with the ‘other’ file name portion of the link, pointing to the new location of the actual file, ie F:\DATA\SALES

The [PVXDEV] header is used, when you want to open some other file, and call a program. Commonly used for printers etc.

The [PVXAPR] header is used for attached printers on the auxilary ports of terminals. PxPLUS opens the ‘other’ file name, calls the program in question, and prints the ‘PS’ mnemonic to the printer. It will also issue a ‘PE’ mnemonic when its attempts to close the file.

Keep in mind. PxPLUS could care less about any ‘type’ of info you think it is… it just does the few simple things.

The easiest way to create these Link Files, is to use the *ucl utility. Just answer the questions. Keep in mind that when it asks for the Link File name, its going to be a REAL file, one you must be able to OPEN in PxPLUS . That means you may need to put it in a specific directory, or make sure that the file can be found using your PREFIX rules.

A few examples of Link Files to Printers would be:
(see also Techtip Windows Printing)

Name of link file LP
Name of file/device *windev*;\\texas\HP on Ne01:
Selected driver HPLASER
Name of link file LP
Name of file/device \\server_name\shared_printer_name\
Selected driver OKI24
Name of link file /MYAPP/P1
Name of file/device >lp -d queuename -c -s 2>/dev/null
Selected driver EPSON
Name of link file SPOOL
Name of file/device /tmp
Selected driver spooler
Name of link file WINDOWS
Name of file/device [wdx]*winprt*
Selected driver myprog

The name of the link is entirely up to you.

The name of the file being opened, is anything you could and must be able to open with a standard OPEN() statement. Physical ports, spooler queues, the windows printer subsytem, TCP/IP ports, ODBC links, anything.

The program is whatever you want, from the ‘*dev’ directory…
Feel free to make your own.


What’s a Device Driver ?

A PxPLUS Device Driver is just a ‘CALL’-program to initialize and preparate a device or file, opened on a channel.

ie.:
Name of ‘link’ file: LP
Name of file/dev.: /dev/lp0
Selected driver: OKI
OPEN(1)”LP”

They have the same effect of you doing:

OPEN(1)”/dev/lp0″
CALL “*dev/OKI”
SETFID (1)”LP”

Here’s the thing that everyone forgets. ‘OKI’ is just a called program. Anything and everything can be done inside them. You can open other files, you can ask for input from the user, you can call other programs if you want… they are just called programs… whatever you can or would code can be put in them.

If you load a Device Driver and look at it, such as HPLASER, or SPOOLER, you can see that there is nothing special about them.

At the top of the Device Driver you’ll see:

DEFTTY (LFO) cols,rows or DEFPRT (LFO) cols,rows.

DEFTTY and DEFPRT tell PxPLUS that the file opened is either a terminal or a printer, without this, PxPLUS thinks is just a simple file. When you do use these, then PxPLUS knows to give you the FIN() information back in either TERMINAL format or PRINTER format. It uses the cols and rows to give you some starting values to use, if you query the FIN() or the MXC(), MXL() functions.

LFO and LFA are two PxPLUS variables, just like DAY or SSN are variables.
LFO stands for the Last File Open number and LFA stands for the Last File Accessed number.

A simple Device Driver such as the ‘*dev/epson’ or ‘*dev/hplaser’, show you that you can define mnemonics to channels, and how to go about doing that. Remember that mnemonics are defined for a specific channel, and only exist as long as that channel is opened. You can invent and define your own mnemonics if you like !

Mnemonics are defined ‘to’ a channel, meaning there are only available when used on that specific channel. The MNM() function can be used to re-use mnemonics from OTHER channels. For example, you could define the ‘PS’ and ‘PE’ mnemonics for starting and stopping the aux port on a terminal, in the terminal driver. Then in your printer driver, you can re-use them from channel 0 (your terminal) and apply them to the printer channel…. good for the life of the channel and no more.

There are also a couple of special mnemonics, that you can define for when a file is closed. ‘*C’ is a mnemonic that you can set for PRINT’d escape sequences (or other PRINT style commands) to send to the channel when it is closed. ‘*R’ is an operating system command to issue when you close the channel. One of the items currently on the wish list, is a mnemonic that can be defined that will CALL a program name given in a mnemonic, when a channel is closed. The calling of a program automatically at the time of closing is not yet available but will be soon.

Then there is ‘*I’ and ‘*O’. If you know what ‘mapchan’ is, then you understand what these two mnemonics will do for you.
‘*I’ is an ‘input’-table and ‘*O’ is an output table.
You can remap any character to another character if you want.
ie: MNEMONIC ‘*O’=$00 01 02 03.. .. ..1C 1D 1E 1F 2E 21 22 .. .. .. .. .. FE FF$
This table will print a ‘space’ as a ‘dot’. (The hex-value of a ‘space’ is $20$ and this is replaced by $2E$, a ‘dot’ )

There is nothing that says that your called program can’t close the ‘file to be opened’ and change it to something else. The best thing to do if you wish to do this sort of thing is to save the FID() name of the original file and the channel to variables. Then set the name back to the original using the SETFID() command.

I also mentioned that you can call other programs. You can do anything you want.

An example of a more complex Device Driver would be:

! My driver
PCHAN=LFO, PNAME$=FID(PCHAN)
CLOSE(PCHAN)

[ code to check for the existance of a lock file ]
[ if a lock file exists do an EXIT ERR so that the err code gets sent back to the err= in the open statement ]
[ code to create a lock file ]
[ code to create a temporary file: ‘MYOUTPUT’ ]

OPEN(PCHAN)”MYOUTPUT”

[ call to a program with the mnemonic defs ]

SETFID (PCHAN) PNAME$ ( yes, SETFID works on files also !)
EXIT

You can do anything you want. You could build a Device Driver that reads a file to get all of the printer characteristics from … like the config.bbx you’re used to, then read the record in, parse and set the mnemonics, create lockfiles, put up a dialogue box and ask the user how many copies they want.
Another element of PxPLUS that you can use is the OPT= in an open, and the OPT() function.

The OPT(channel) function, will return the string used in the OPT= from the open clause of any channel. You can use the OPT= in your opens, then use the OPT() function to get those parameters in your driver, parse them and put the code in the responds to whatever you want. Example:

Say you have a Link File name ‘LP’, with the ‘other’ filename to open as ‘/dev/lp0’ and the program name is ‘myprog’

OPEN(1,OPT=”Check the paperform”) “LP”

<PxPLUS Internally>
[PxPLUS reads the LP Link File]
[Closes the file LP]
[Opens the file: /dev/lp0]
[Uses SETFID to change the name from /dev/lp0 back to LP]
[Calls *dev/myprog]

<Inside *dev/myprog>
options$=OPT(LFO)
[options$ is now ‘Check the paperform’]
IF NOT(NUL(OPTIONS$)) MSGBOX OPTION$,”Message”
[called program EXITS]

<PxPLUS Internally>
[If called program exits with an error, then send that error back in the OPEN() statement and take the err= branch if there is one]

<Processing continues>

Another function that few people realize is SETDEV TSK() string

This directive can load entries into the TSK() function, the string can be anything you want. The only problem with it is that you can’t erase the entries and start over. The string can be anything, formatted however you like. Whatever you put in you’ll get back.
SETDEV TSK() $0100$+”LP”+$00$+”>lp -dqueue %COPIES% -s 2> /dev/null” +$00$
SETDEV TSK() $0100$+”P1″+$00$+”/dev/lp1″+$00$
They’ll return in TSK(0) and TSK(1)

Or you can simply make an entry in a file, then in your Device Driver you could open that file, retrieve the record that matches it, parse the %COPIES% out of the string, if it exists, substitue ‘-n numcopies’ with it.

The trick is there are no limits. You could open 100 files while in your called program, each on its own channel if you want… anything goes.

If you look at the ‘*dev/spool’ driver, it wants the ‘other’ file to open, to be a directory name. It then captures this directory name, closes it, builds a filename for a temporary file, and uses that original directory name from the link as the place to store those temporary spooler files. Then at the end of the driver, it builds an >lp command line, and sets the mnemonic ‘*R’ to that os command. You can have more than one command in the *R, just separate them with a ‘;’ just like any other os command you would do.

I used this approach to create a temp file, send it to the spooler, ensuring that the spooler made its own copy of the file, and then did an ‘rm’ of my original temp file. The *R got run when the channel was closed, so at that time, the file was sent to the spooler, and the temp was erased.

I would likely create a keyed file, with records of LP P1 P2 etc, where one of the fields was the spooler command, or physical port name to open, another field would be a called program to set the mnemonics for the printer type. Then I would create Link Files of LP P1 P2 etc, using the name of my keyed file as the ‘other’ name to open. I would have only one Device Driver program.
In that Device Driver, I would save the channel number (lfo) and the name of the channel (fid(lfo)), read the record from my keyed file, and close the channel.
I would parse any options into the spooler command as necessary, then open that final command on the original channel, set the name back to its original using the SETFID command.

A special Device Driver is ‘*dev/windows’. This one is used with PVX for Windows.
Don’t change anything to this driver. As a matter of fact, you better make copies of any driver you wish to modify, because if you install a new version of PxPLUS , they get overwritten. If you want to do something specific, you can do it in a special directory ‘lib/_udev’. (Create it, if it doesn’t exists.)
PxPLUS will search in this directory for your own terminaldriver and if it finds the right one, it will be executed.
ie.: You want blue characters on a white background in PVX for Windows.
Make a program called ‘*udev/windows’
0010 ! Windows
0020 print ‘blue’,’_white’,’df’,’cs’,
0030 exit
>save”*udev/windows”
>start

The biggest thing is, it’s just terminology, the whole idea of Link Files and Device Drivers is really quite simple, because anything goes… it’s as powerful as you could ever want it to be. You can do anything you can imagine inside a Device Driver… ’cause its just a called program… just like any other called program.
Link Files are just a way of associating some ‘other’ file name and a program, to an ALIAS name.


(Original text from Gord Davey, edited and adjusted by Tino Vanholst)

PRINTING with PxPLUS

With PxPLUS for Windows, there are two print devices :
*WINPRT* and *WINDEV*
Both devices use the Windows’ spooling system.

With *WINPRT*, the job will be interpreted by the Windows’ print API, and then passed on to the printer driver, building the final file which is queued up and sent to the printer.

*WINDEV* is a special interface to the Windows Print spooler which implements a ‘PASSTHROUGH’ mode allowing you to send escape sequences directly to a printer.
This provides an interface similar to opening ‘LPT1’ directly.

Note:
*WINPRT* is your only choice to print ‘fonted scalable text’, images, boxes, lines, etc. along with plain text.
*WINDEV* is your only choice to send printer specific ‘escape-sequences’ along with a text to the printer but will not support any GUI Mnemonics.

Example 1

OPEN (1) “*WINPRT*
….<snip>….
PRINT (1) ‘FONT'(FONT$,int(C*.8)),
PRINT (1) ‘TEXT'(@x(X+66.5),@y(Y+.5),@x(X+75),@y(Y+2),FC$),
PRINT (1) ‘PEN'(1,4,0),
PRINT (1) ‘RECTANGLE'(@x(MX),@y(MY+5),@x(MX+20),@y(MY+7)),

Example 2

OPEN (1) “*WINDEV*”
PRINT (1) ‘BO’,ESC+”(s12H”,’EO’, ! HP Laser 12 cpi mode. Do not use ‘BO’+ESC….+’EO’
PRINT (1) TXT$

When you open the Windows’ spooler with either *WINPRT* or *WINDEV* you can specify a series of options separated by semi-colons following *WINxxx* in the path name.

By default, as if you just issue an

OPEN (1) “*WINPRT*”

PxPLUS will pop-up the standard Windows’ printer selection box and let you choose which printer you want to use along with various properties such as orientation, copies, print to file, etc.. The printer and properties selected will remain current throughout the rest of the PxPLUS session.

To force the assignment of a specific printer, place such printer name following the *WINPRT*, separated by a semi-colon:

OPEN (1) “*WINPRT*;Epson FX-80 on \\server1\queue1”

This will open an Epson FX-80 printer (as per the Windows control panel) on \\server1\queue1.

There are also a couple of special queue names: “ASIS” and “DEFAULT”.
“ASIS” will open the printer with exactly the same settings from the prior print job, and “DEFAULT” opens the printer queue which is currently “set as default”. Neither of these will display the printer selection dialogue.

OPEN (1) “*WINPRT*;ASIS”

To find out the names of all the configured printers in the system use the directive:

WINPRT_SETUP LIST X$

This will place a list of all configured printers into X$ (comma separated).

To find the current selected printer:

WINPRT_SETUP READ X$

To change the current selected printer:

WINPRT_SETUP WRITE “Epson FX80 on \\server1\queue1”

To set printer properties, add the properties following the printer name, separated by semi-colons such as:

OPEN (1) “*WINPRT*;Epson FX80 on \\server1\queue1;ORIENTATION=LANDSCAPE;COPIES=3”
or
OPEN (1) “*WINPRT*;;ORIENTATION=LANDSCAPE”

  • Note the double semi-colons with the second statement.

To determine the current selected printer properties:

WINPRT_SETUP READ PROPERTIES P$

To set the current printer properties:

WINPRT_SETUP WRITE PROPERTIES P$

One of the printer properties is OFFSET.
The OFFSET, if returned, will be in 1/1000″ of an inch. However, the margin size is not something PxPLUS can retrieve. Therefore there may be some variation to the margins between different printers.

The following command will set a 1/2 inch left margin and a 3/4 inch top margin:

WINPRT_SETUP WRITE PROPERTIES “OFFSET=500:750”

This provides pretty accurate x and y coordinates for the page. In the event that margins shift around in your report, add some code for different printers in order to move the OFFSET around. Adjusting the OFFSET can compensate for different margin sizes. OFFSET can be specified with positive and negative values.

To get the list of available fonts:

OPEN (1) “*WINPRT*” (Printer must be opened first)
F$= ‘FONT’ ( LIST *, channel )
PRINT F$ (Prints list of fonts, comma separated)

Find out about the font sizes of a certain font and check whether this font can be printed by:

S$=’FONT’ (LIST “Arial” ,channel)

From this list of font sizes, set the default font with:

PRINT (channel) ‘FONT'(<font name>,<font size>),’DF’,
PRINT (channel) ‘FONT'(“Arial”,-10),’DF’,

Be aware of the negative size value.
A negative size means: use that point size
A positive size means: use this factor relative to the default size.

PRINT (channel) ‘FONT'(“Arial”,0.75),’DF’,

With this option, the font size can be increased or decreased and increases or decreases the number of print positions.

PRINT (channel) ‘FONT'(“Arial”,mxc(channel)/<positions_required>),’DF’,

Be careful with the point sizes of the fonts. Rounding to the nearest “supported” point size will occur. For example: If you specify a point size of 1.5, Windows will round this to a size it supports. The print driver will also influence the point size rounding.

MXC() and MXL() return different values when a default font size from different printers has been forced.

The values will vary from one printer to the next. It will vary based upon the supported fonts or font sizes for the printer driver, as well as the margins and offsets currently set for the driver. It will also vary based upon the paper size and orientation (landscape vs portrait) for that printer. We have never seen the exact same col/row values yet when switching between different printers/printer drivers. This is why we recommend that the logic should dynamically adjust the size, until you get the minimum number of cols/rows, required for the report. However your report may vary slightly in size during output.

A lot of such instructions are implemented in our sample program “fontpick”.


Windows will add a form feed to the end of a job, whether you send it through *WINPRT* or through *WINDEV*. Therefore, whenever you close the printer, the job will end, and a form feed is produced.

To print directly to the printer, open ‘LPT1’ directly. However, we advise to use an UNC (Universal Naming Convention):

OPEN (1)”\\server_name\printer_name”

If PRINT causes an error 13, add a LOCK(1) to your code right after the OPEN.

To make your report look the same on every printer, the two mnemonics ‘CPI'() and ‘LPI'() can be of help.
Add a number (per inch) to force the @X() @Y() locations to be more exact and independent from the selected default font.

For example:

OPEN(1)”*WINPRT*”
PRINT (1)’FONT'(“Courier New”,-10),’df’,
PRINT (1)’CPI'(10),’LPI'(6),

The first print statement forces the printer to a specific font, and recalculates the number of columns and rows the print driver will support per page for this printer.

The second print line forces 10 characters to the inch, and 6 lines to the inch. This does NOT change the default font, but it changes PxPLUS internal calculations of the column and row to real pixel coordinates. In this example, a print @x(0) would be up against the left margin of the page, while @x(10) would be exactly 1 inch from the left margin, @x(20) would be 2 inches from the left margin and so on. The same applies to @y() in relation to the ‘LPI'().

However, the coordinates determine the printable area of the page. Therefore the differences from one print driver to the next can have an impact on margins and offsets.


Questions & Answers

Q: When printing with “*winprt*” is there a way to abort the printing by an instruction and remove the current print job from the print spooler?

A: Adding an ‘AB’ mnemonic to the *WINPRT* channel will abort the current document while


Q: In Windows, how do I determine which printer is set as the current printer?

A: You could do something like:

WINPRT_SETUP READ A$

and A$ will contain the name of the open current printer.


Q: In Windows, how do I determine which printer is set as the default printer?

A: Windows stores the Default Printer in the WIN.INI file. To find out what it is, you can use the *INIFILE Utility to read this value:

CALL “*INIFILE;READ”,”WIN.INI”,”Windows”,”Device”,””,default_prt$,80
PRINT default_prt$


Q: How can I access local printers from a WindX Workstation?

A: To access a Printer on the local WindX PC, insert “[WDX]” in front of the Print Name.

For example:

OPEN (1)”[WDX]*WINPRT*”
or OPEN (1)”[WDX]*WINDEV*”
or OPEN (1)”[WDX]LPT1″


Q: How do I know when I am in WindX so I can print to local printers ?

A: We recommend that you set a global variable if WindX is running. Add a line like this to your startup program:

IF MID(MSE,22,1)>$00$ AND MID(MSE,22,1)<$FF$ THEN %WDX$=”[WDX]”

Then, where you open the printer, add:

OPEN(CHAN)%WDX$+”*WINPRT*”

The %WDX$ variable will get a value only when running WindX, if not the variable will be empty.


Q: How can I open and close the printer without printing a ‘Form Feed’ ?

A: OPEN INPUT (chn) “*WINPRT*”

This will allow you to open the printer but not start any document. In fact, it simply tests whether the printer is present and determines which fonts are available using the ‘FONT'(LIST *,chn) function.
The INPUT clause indicates that the printer is in ‘Query’ mode only. After all, it is hard to print to an input only device.


Q: How can I ‘right justify’ columns ?

A: The ‘JR’ and ‘JD’ mnemonics work with fixed length outputs. Which means, when sending numeric data, the output is formatted using a consistent format mask.

‘JR’ takes the length of the following string and determines whether the end-point is based upon fixed length printed output. Just like printing 10 characters at 10 CPI, the printed width must be right justified within one inch. Once the length of the field is determined and the end point is computed, PxPLUS subtracts the true length of the printed text based upon the proportional font chosen to determine the start point for the text. The result is right justified output assuming all the fields are the same length.

‘JD’ is a variation thereof and is based upon numeric output. Instead of computing the end-point it computes the location of either the last digit or the decimal point. For example if you print 1234.56 with the format mask (###,##0.00), PxPLUS computes the location of the decimal point. PxPLUS takes the number of characters in front of that point (8 in the above example) and multiplies the logical CPI resulting in 8/10ths of an inch. PxPLUS , then subtracts the actual size of the first eight characters from the output as per the proportional font selected and uses this as the start point for printing the complete output. The net result is that the final digit and/or decimal point will always be aligned in the same position assuming a consistent format mask. A trailing sign, ‘)’, ‘CR’, or ‘DB’ will not effect the alignment.

It is important to remember that with both the ‘JR’ and ‘JD’ mnemonics, the output must always be the same length, that is, numeric data MUST be printed using a format specification.

Please note that a standard PRINT (channel) <num_value>:”##,##0.00″, without any justification, will always be formatted with the ‘JL’ mnemonic.


Also remember …..

PxPLUS prints with two different printing planes. One for Text and one for Graphics. Fonted text is printed on the graphics plane. The graphic plane lays on top of the text plane.

The one exception to this is the ‘FONT'() followed by a ‘DF’, which sets the font height and width of the characters printed on the text plane. All plain print commands will then use this text font and size on the text plane until you issue another ‘FONT'() followed by a ‘DF’. This of course, re-adjusts the character size of the text plane.

Remember also that the X and Y coordinates for each column and row are based upon the cell size of the text plane.

All other ‘FONT’ () commands affect the graphics plane. To place text on the page in the graphics plane, you need to use a ‘TEXT'() mnemonic. A regular print command with no ‘TEXT'() mnemonic places text on the text plane.

A common way to print is to open the printer. Print a ‘FONT'() which has a specific point size (negative size value) and a ‘DF’. Then you can print around the page on the graphics plane, printing ‘FONT'() and ‘TEXT'() mnemonics to get your differe

Invalid activation.

Did you ever get this error message ?

Most of the time this is the result of moving all or part of your ProvideX files on the disk. With the activation, you have created a directory: /pvx/lib/keys.
Once activated, you should not move this directory.

There are two ways to correct this problem:

1) Go to the directory “/pvx/lib/keys/”. Delete the activation file “activate.pvx”.
Run the activation program and use the keys you already have.
Always activate with the temporary key first and check if ProvideX starts correctly.
Then activate with the permanent key.

2) Delete the ‘keys‘ directory.
Run the activation program, use the existing temporary activation key.
You will now have a new system id.
Request a new permanent key from your EDIAS sales office with the following information:


  • serial number
  • system id
  • machine class
  • number of users
    Upon receipt of your new permanent key, activate your system with this key. Note: For new keys do not contact EDIAS Support. Keys are only available from our sales offices.

ProvideX Updates
Check our web site (www.edias.com) for new releases to be downloaded at no charge.
Always install your new release of ProvideX over the existing installation.
The new release will use the old install parameters and automatically re-activate.
You do not have to run the activation program again.

POS function

More powerfull then you thought
Look at the following routine:

0010 begin
0020 dim A[1:5],A$[1:5]
0030 let A$[1]="alfa "
0040 let A$[2]="bravo "
0050 let A$[3]="charlie "
0060 let A$[4]="delta "
0070 let A$[5]="echo "    !Spaces for readability only.
0075 print A${all}
0080 let A{all}=pos("a"=A${all}) 
0090 print A{all}
0100 let A{all}=pos("a"=A${all},1,0)
0110 print A{all}
The number-array is the result of the 'POS' function from the string-array
	A[1]=pos("a"=A$[1]) 
	A[2]=pos("a"=A$[2]) 
	.....
	A[n]=pos("a"=A$[n])

And ... did you know this one ?

PRINT POS ( "abc" : "Scissor" )
Please note that we use a colon (:) instead of the equal (=) sign.
We are looking for an 'a' or 'b' or 'c' in the string  'Scissor'.
The result is the position of the first matching character in the string.
In this case, the first matching character is a  c' at the second position.
Subsequently, the result is '2'.

Or:

PRINT POS ( "abc" ^ "Scissor" )
We now check the position with a character not matching the characters 'a' or 'b'
or 'c'. In this case it is the very first position with the character 'S'.
Subsequently, the result is '1'

SELECT

We like to draw your attention to the exiting features from “SELECT”. With SELECT you are able to substantially reduce the number of lines of program code . The following routine shows a ‘classical’ way to read a file ‘sale’ (invoices) using a secondary key customer number’. With the invoice number, we then read the invoice items from a file ‘sale_itm’.

0010 rem TT1A
0020 begin 
0030 open (1)"sale"
0040 open (2)"sale_item"
0050 input (0,err=0050)'CS',@(10,10),'SB',"Customer number ",'SF',CUST$
0060 gosub GET_INVOICE
0070 goto 0050
1000 GET_INVOICE: ! ^1000  --------------------------------------------
1010 let K$=CUST$
1020 extract (1,key=CUST$,kno=2,dom=1030)iol=1140; goto 1150
	Put the file pointer right in front of the invoice for the selected customer. 
	Read with  kno=2'
1100 READ_INVOICE: rem ^100
1110 let K$=key(1,end=1180)
1120 if K$(1,5)>CUST$ then goto 1180
	Read until the end of file or until the last invoice for the selected customer
	number..
1130 read (1)iol=1140
1140 iolist INVOICE$,DATE$,EXPDATE$,CUSTOMER$,TOTAL,NET,TAX,DISCOUNT
1150 print INVOICE$," ",DATE$," ",CUSTOMER$,TOTAL:"###B###B##0.00-"
1160 gosub GET_DETAIL
1170 goto READ_INVOICE
1180 return 
2000 GET_DETAIL: rem ^1000 ------------------------------------------
2010 let D$=INVOICE$
2020 extract (2,key=INVOICE$,dom=2030)iol=2140; goto 2150
	Put file pointer to the correct invoice.
2100 READ_DETAIL: rem ^100
2110 let D$=key(2,end=2170)
2120 if D$(1,10)>INVOICE$ then goto 2170
	The necessary checks to read the correct invoice items.
2130 read (2)iol=2140
2140 iolist D_INVOICE$,LINE$,PRODUCT$,D_TOTAL,D_NET,D_TAX,D_DISCOUNT
	TOTAL' etc. may have been used in an earlier IOLIST. Therefore, we have
	to choose new VARIABLES.
2150 print @(20),PRODUCT$,D_TOTAL:"###B###B##0.00-"
2160 goto READ_DETAIL
2170 return 

For the next routine, we will use “SELECT” and the embedded iolist. You immediately notice that we have substantially reduced the number of lines of code . A lot of code has become obsolete. No more annoying IF..THEN’ and GOTO’. No more need to OPEN files at the beginning.

0010 rem TT1B
0020 begin 
0030 ! 
0040 ! 
0050 input (0,err=0050)'CS',@(10,10),'SB',"Customer number ",'SF',CUST$
0060 gosub GET_INVOICE
0070 goto 0050
1000 GET_INVOICE: ! ^1000  --------------------------------------------
1010 ! 
1020 ! 
1100 ! ^100
1110 ! 
1120 ! 
1130 select * from "sale",kno=2 begin CUST$ end CUST$+$FF$
	Please note how we access the invoice file with the alternate key.
1140 ! 
1150 print INVOICE$," ",DATE$," ",CUSTOMER$,TOTAL:"###B###B##0.00-"
1160 gosub GET_DETAIL
1170 next record 
1180 return 
2000 GET_DETAIL: rem ^1000 ------------------------------------------
2010 ! 
2020 ! 
2100 ! ^100
2110 ! 
2120 ! 
2130 select *,rec=D$ from "sale_item" begin INVOICE$ end INVOICE$+$FF$
	To avoid VARIABLES with the same names, we use the prefix:  ',rec=D$'
2140 ! 
2150 print @(20),D.PRODUCT$,D.TOTAL:"###B###B##0.00-"
2160 next record 
2170 return 
Other ways to use SELECT are:

SELECT A$,B$,C$ FROM "filename"	
	Use VARIABLES instead of 'embedded' IOLIST  

SELECT iol=500 FROM "filename"
	Use an IOLIST

SELECT * FROM 1
	Use a file, already open on channel 1

SELECT * FROM "company" WHERE ( lang$="1" and ZIP$>"B") 
	Read records selectively. 
	Data fields without a key are selected with WHERE

X$="lang$="+quo+"1"+quo
SELECT * FROM "company" WHERE EVN(X$)	
	Read records selectively. Use EVN() to select.
SELECT ... NEXT RECORD routines can be interrupted with  'EXITTO'
Example:
In order to delete a customer from the file, we first need to check whether there
are related records in this file. In the event of only one such record the routine will
be interrupted.
SELECT * FROM "sale",kno=2 BEGIN cust$ END cust$+$FF$
PRINT "Do not delete this customer"
EXITTO DO_NOT_DELETE
NEXT RECORD
OKAY_TO_DELETE:
K$=KEC(LFO) 	returns the key just read with SELECT.

Techtips


© 2015 EDIAS Software International. All rights reserved. ProvideX® is a registered trademark of Sage Software Canada Ltd. © 2005-2018 PVX Plus Technologies Ltd. All rights reserved.