PREINPUT -1300; ESCAPE ! Opent het TRACE venster
PREINPUT -1301; ESCAPE ! Opent het COMMAND venster
PREINPUT -1302; ESCAPE ! Opent het WATCH venster
PREINPUT -1303; ESCAPE ! Opent het BREAK venster
This code works only in a Windows ProvideX/Plus session – in a WindX environment these commands will not result in opening the corresponding debug window. Therefore, it is recommended to change this code to:
PRINT 'OPTION'("DebugWindow","Trace"),
PRINT 'OPTION'("DebugWindow","Command"),
PRINT 'OPTION'("DebugWindow","Watch"),
PRINT 'OPTION'("DebugWindow","Break"),
When using WindX, it is advisable to start the Trace, Watch, and Break windows so that they monitor the application on the server side. This can be done by placing the word “Host” before the name of the debug window, for example:
PRINT 'OPTION'("DebugWindow","Host Watch"),.
To connect a debug window to the server application after it has already been started, send:
PRINT 'OPTION'("DebugWindow","Host Trace Enable"),.
Variables to be monitored and break instructions can also be loaded into the debug windows using the ‘OPTION’ mnemonic. For example: PRINT 'OPTION'("DebugWindow","Host Watch Add A$"), will add the variable A$ to the Watch window, and PRINT 'OPTION'("DebugWindow","Break Add Test=LEN(A$)>0"), will load a break that stops the application as soon as the length of A$ is greater than 0.
For a complete overview of all possibilities regarding debugging windows, refer to the ProvideX Language Reference PDF (v9.10) under 5. Mnemonics / OPTION.
Note: To use the ProvideX/PxPlus debugging windows, the INI file in use (use PRINT ARG(-1) to see which file you are using) must contain a [Config] section with Debug=1 (without quotes).
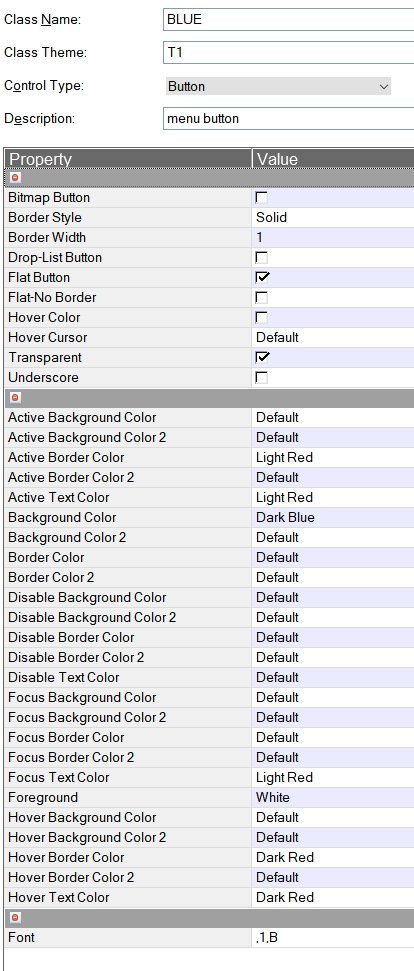
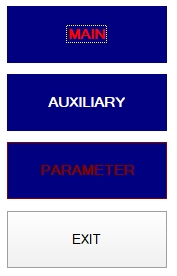
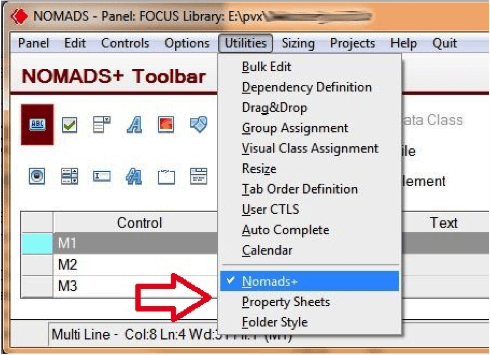
Want to quickly and easily give your application a new look? With “Themes” and “Visual Classes” you can. Themes are the former Templates. They determine the appearance of objects throughout an entire library. Therefore, they are set in the library defaults.
Visual classes apply to a single object. You have to set them individually for each object. In this example, we’ll work only with buttons, but other objects can be used as well.
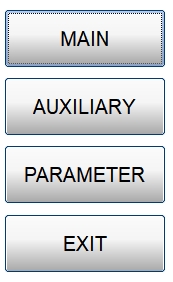
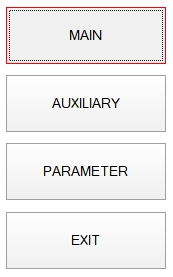
We’ll take these buttons as an example:
Font: Arial, 20 points
Foreground: default
Background: default
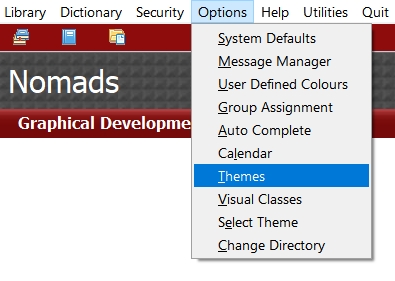
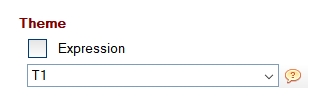
We will now create a “Theme.”
To do this, start Nomads and choose in the menu: Options > Themes.
Choose the name “T1” and control type: Button.
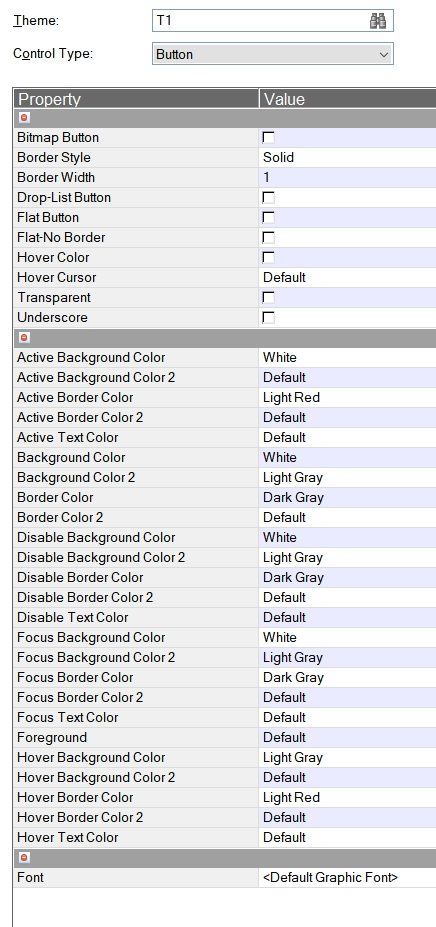
You will see several extra options that are normally not available for a standard button.
For example, “Hover Border Color”.
The goal is to have a red border around the button when you hover the mouse over it. In this example, a few other colors are also shown.
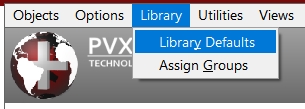
This theme “T1” is linked to our library via Library Defaults.


Starting with this version, the ACTIVATE.PVX file is placed in a "PXPKEYS" directory, located one level higher than the PxPlus installation directory.
For example, if PxPlus is installed in the default directory: C:\PVX Plus Technologies\PxPlus 2014 then the activation file will be placed in: C:\PVX Plus Technologies\PxpKeys.
This means the activation is no longer tied to a specific PxPlus version, allowing different PxPlus versions (whether installed simultaneously or not) to use the same activation.
You can always refer to a specific activation by using: ActivationKey=path_to_directory_with_activate.pvx inside the [Config] block of the INI file, for example: [Config] ActivationKey=D:\PxPlus\pxpkeys
If you upgrade an existing Windows PxPlus installation to v2014 and a lib\keys directory from an older installation already exists, v2014 will continue to use that activation and will not create a pxpkeys directory.
Similarly, Unix and Linux v2014 versions will continue to use the activation in the lib directory (regardless of whether it was an upgrade or a fresh installation).
Starting with PxPlus Windows version 11, you can add a LOGFILE= entry in the [CONFIG] section of the INI file. LOGFILE= should point to an existing path, for example: LOGFILE=D:\tmp\logv11.txt
The path D:\tmp must already exist; the text file logv11.txt will be created if it does not yet exist. If PxPlus encounters an internal error, it will write one or more entries to the log file. Additionally, if PxPlus is terminated by the operating system (for example, by accessing a memory location outside PxPlus memory space, resulting in the well-known "PxPlus has stopped working" message), this will also be recorded in the log file. This allows you, in the event of a PxPlus crash, to determine the exact point in the application where the issue occurred.
Each log file entry follows this structure: Date Time [Program:line] Description of the problem
Example:
Aug 13 16:52 [D:\pxplus\pxp7\misc\zip_format.pgm:160] *OUT OF MEMORY* - Global Alloc failed
Aug 13 16:52 [D:\pxplus\pxp7\misc\zip_format.pgm:160] *OUT OF MEMORY* Unable to allocate
  1760559116 bytes
Aug 14 13:40 [*plus/web/request:120] [TCP][Winsock]Error status:10035(796:)
Aug 19 09:44 [D:\pxplus\pvxplus11\misc\blobtest.pgm:200] Fatal exception error code
  c0000005 occurred
Aug 19 09:44 [D:\pxplus\pvxplus11\misc\blobtest.pgm:200] - ERR=0 CTL=0 RET=258 LFA=1 LFO=1
Aug 19 09:44 [D:\pxplus\pvxplus11\misc\blobtest.pgm:200] - Last path used: [MySQL]mysql;
Aug 19 09:44 [D:\pxplus\pvxplus11\misc\blobtest.pgm:200] - Program stack follows:
Sep 18 09:59 [*winlist:5193] *MEMORY LIMIT HIT* - About to report an error 31
Dec 17 09:17 [webreq:12240] SSL Chkerror socket 488 sts 0 yields 5
Dec 17 09:17 [webreq:12240] [TCP][Winsock]Error status:10035 (488:)
Jan 13 09:12 [*ezweb/server:444] * Error:404 Not Found Request:/favicon.ico
Jan 13 09:12 [*plus/winutl/winqry:1615] Skipping ref to control 0 (Disable) at
  1615:D:\PxPLUS\PvxPlus11.5\lib\_plus\winutl\winqry (255:D:\PxPLUS\PvxPlus11.5\lib\_winlist)
Jan 13 09:14 [*ezweb/server:36] Shutting down *ezweb/server
You can also create entries in the log file directly from your application by using SETTRACE RECORD.
For example: SETTRACE RECORD "OOPS" in console mode will result in the following entry:
Jan 20 13:37 [:0] OOPS
Starting with PxPlus 2014 v.12, this functionality is also available in Unix and Linux PxPlus versions. To activate the log file in Unix/Linux, create a file named pvxtrace.log in the PxPlus directory. If PxPlus v.12 detects that this text file exists, it will automatically use it to store internal messages.
#!/bin/sh
PVXLIB=/pxplus/lib
PVXFLMAP=\\/
export PVXLIB  PVXFLMAP
umask 0
cd /pxplus
{su username}
/pxplus/pxplus -dr=/pxplus/ *plus/cs/host -arg 4093 {forced program} >/dev/null &1
A new feature has been added in PxPLUS v6.10, where a Windows Printer may be defined on a PC so that it appears in the Windows Printer Selection Dialogue, and if that printer is selected from within a PxPLUS session, then PxPLUS attempts to re-route the printer to a device driver.
This allows Developers to create Windows Printer’s on workstations for items such as the Preview, PDF, or HTMLoutput from PxPLUS.
This feature works based on the name and properties of the printer.
You should now have a printer named “PxPLUS Viewer” as one of this workstation’s printers. From within any PxPLUS application, you will see this printer in the *WINPRT* printer selection dialogue. Whenever this printer is selected, PxPLUS will re-route the printer to the specific device driver.
In the case of our example, we have created a printer named “PxPLUS Viewer” which is connected to “NUL:”. If selected from Printer Selection, PxPLUS will automatically close “*WINPRT*” and open the file “*VIEWER*” instead.
NOTE: This will ONLY work in PxPLUS applications!
If the user selects one of these special PxPLUS mapped printers from another application (Word, Notepad, etc.), they will get NO output.
First, let's go over the commands, functions and parameters related to finding files.
'CD' parameter.
The 'CD' parameter is set to 'OFF' by default, which means that the current directory will only be searched after the directories in the PREFIX list.
If the parameter is 'ON', PxPLUS will first look in the current directory, and only then in the PREFIX list.
(see also 'Search Rules')
To check the content of the parameter: PRINT PRM ( 'CD' )
and to change the parameter: SET PARAM 'CD' = 1 (or 0)
PREFIX
You can compare the PREFIX command to the PATH variable in MS-DOS or UNIX.
Use the PREFIX command to specify a series of search paths where PxPLUS should look when you perform an OPEN / LOAD / RUN / CALL / PERFORM on a file or program without a full path name.
Example:
PREFIX “/usr/mydir/data/ /usr/mydir/prog/ /usr/mydir/sub/ D:/other/data/”
In other words, if you open a file with a full path name, the search rules do not apply.
The names in the PREFIX must be separated by a space.
As you can see, the drive letter may be added to the path name in order to search on a drive other than the one made active with the SETDRIVE command.
You can specify 10 different PREFIXes, namely PREFIX (0) to PREFIX (9).
Example:
PREFIX (0) “/usr/mydir/data/”
PREFIX (1)”/usr/mydir/prog/ /usr/mydir/sub/”
PREFIX (2)”D:/other/data/”
The advantage is that you can DISABLE and ENABLE a specific PREFIX.
e.g.: DISABLE 2, and you stop searching in D:/other/data/.
PREFIX (0) ” … ” is the same as PREFIX ” … ”
If there are path names that already contain a space, you must enclose that path name in quotation marks.
Example:
PREFIX “C:/Tmp/ C:/usr/ “”C:/Program Files/”””
PRINT PFX or PRINT PFX (n) shows the content of PREFIX.
' = ' sign for special search operations.
The '=' sign in the PREFIX has a special meaning. Each '=' sign corresponds to a letter (or digit) of the file name and is replaced by it. The first '=' sign is replaced by the first letter of the file name, the second '=' by the second letter of the file name, and so on.
The idea is to divide large directories into smaller ones for faster access and better management.
Example:
Suppose your application consists of several modules. From the name of a program, you can already see to which module it belongs.
e.g. BH001 BH002 BH003 belong to the accounting module and LN001 LN002 LN… belong to the payroll module. You can then split your (large) directory into several smaller directories. The name of these subdirectories must match the first letters of the module names. In this case BH and LN.
If PxPLUS now searches for a program or file, it evaluates the first matching letter(s) and uses them to look in the correct directory.
Example:
PREFIX “/myapp/==/”
OPEN (1)”BHHIST”
PxPLUS evaluates the file name BHHIST and turns it into ‘/ myapp / BH / BHHIST’ (1), and thus tries to open the file.
Asterisks as PREFIX wild-cards.(2)
You can use '*' and '**' as wildcard characters in PREFIX to support (new) file name extensions without having to change your programs.
This extension was introduced in version 4.20 mainly to be Windows 2000 certified. To be Windows 2000 certified, your files and programs must have an extension. With the wildcard characters in PREFIX you can give your files a specific extension without having to change your programs.
A single asterisk (*):
If your PREFIX command contains an asterisk followed by an extension, PxPLUS will replace this asterisk with the file name you are trying to open.
With the result, PxPLUS will then try to find the file, and if not found, it will still try to open the file without an extension.
Example:
PREFIX (5) “*.dat”
OPEN(1)”customer”
PxPLUS scans the directory for ‘customer.dat’ and opens the file. If ‘customer.dat’ is not found, PxPLUS continues searching for ‘customer’. If found, PxPLUS opens the file; if not, PxPLUS generates an ERROR 12.
Note!
KEYED “abcde”,5 will not create the file ‘abcde.dat’ but will create ‘abcde’, and
ERASE “abcde” will erase the file ‘abcde.dat’!
Double asterisks (**):
If your PREFIX contains two asterisks together with an extension, then the substitution described above will only occur if the file name in the OPEN command does not already have its own extension. If the name already has an extension, no automatic replacement will occur.
Example:
PREFIX “/mydir/**.dat”
OPEN(1)”journal”
OPEN(2)”journal.hist”
Since ‘OPEN (1)”journal”’ is a file without an extension, PxPLUS will first look for ‘/mydir/journal.dat’ and then for ‘/mydir/journal’.
Since ‘OPEN (2)”journal.hist”’ already has an extension (.hist), PxPLUS will not add ‘.dat’ and will simply look for the file ‘/mydir/journal.hist’.
PREFIX PROGRAM
Use the PREFIX PROGRAM format to define a search path specifically for programs. PxPLUS will first search in this path, and then possibly in the other PREFIXes, if you perform a LOAD, RUN, CALL, PERFORM, PROGRAM or SAVE.
Example:
PREFIX PROGRAM “/pvx/mydir/pgm/”
to see the content:
PRINT PFX(PGN)
PREFIX FILE
This is not the counterpart of PREFIX PROGRAM!
Use the PREFIX FILE format to perform dynamic conversions of file names. For example, you may have programmed an ‘OPEN(x)”customer”’, but actually want to open “//other_machine/customer”.
How does it work? You define a KEYED file with an external key and a variable record length. If the file does not meet these requirements, you will get an ERROR 17:Invalid file type or contents.
The key is the name as it appears in the program, e.g. “customer”.
The first field is the name of the replacement file, e.g. “//other_machine/customer”.
Then execute the command: PREFIX FILE “PFXFILE”
When opening, PxPLUS will first check this file to see if the file name you want to open exists as a key in this file. If so, the field is used as the file name and all search rules apply again.
Remember that the search mechanism only applies if a relative file name is given. File names with absolute paths are opened immediately without searching.
Example:
KEYED “pfxfile”,25
OPEN(1)”pfxfile”
WRITE (1,key=”customer”)”[odb]ACCESS;CUST;KEY=CUSTNO”
CLOSE(1)
……
PREFIX FILE “pfxfile”
OPEN(1)”customer” ! Internally becomes
>> OPEN(1)”[odb]ACCESS;CUST;KEY=CUSTNO”
As you can see, it is very easy if you want to switch databases. You only need to change the keyed file; your programs remain unchanged.
Since version 4.23, a second field has been added to the PREFIX FILE file.
This is an OPTIONS field. These options are added to the OPT= when opening the file. This was done because the length of the name has a limit of 256 bytes.
Example:
The PREFIX FILE file contains the following:
Key=”customer”, Field1=”[ODB]DSN;customer”, Field2=”KEY=cust_id”
OPEN(1)”customer”
internally becomes:
OPEN(1,OPT=”KEY=cust_id”)”[ODB]DSN;customer”
or …
OPEN(1,OPT=”REC=customer_name”)”customer”
internally becomes:
OPEN(1,OPT=”KEY=cust_id;REC=customer_name”)”[ODB]DSN;customer”
The content of OPT= is in fact appended to the name, resulting in:
OPEN(1)”[ODB]DSN;customer;KEY=cust_id;REC=customer_name”
PRINT PFX(-1) shows you the PREFIX FILE file.
SEARCH RULES
PxPLUS searches for a file or program in this order:
OPEN
1) PREFIX FILE, if used. (Replaces the path name and continues the sequence)
2) Current directory (if 'CD' parameter is on)
3) PREFIX 0 to 9
4) PROGRAM PREFIX, if used
5) Current directory (if 'CD' parameter is off)
LOAD / RUN / CALL / PERFORM / SAVE
1) PREFIX FILE, if used (Replaces the path name and continues the sequence)
2) Program Cache
3) Current Directory (if 'CD' parameter is on)
4) PREFIX PROGRAM, if used
5) PREFIX 0 to 9
6) Current Directory (if 'CD' parameter is off)
The PREFIX search rules apply not only to opening files but also to creating them. PxPLUS will create the file in the first path of the first PREFIX. If 'CD' parameter is on, files are created in the 'active' directory.
Note that once a program is in 'cache', and if you disable the PREFIX from which the program came, PxPLUS will still retrieve the program from cache when called again and will not generate error 12.
PERFORMANCE
What you should avoid is the drive letter at the start of the path name.
SETDRIVE “C:” ! usually this is the default value
PREFIX “C:/myapp/data/ C:/myapp/files/ D:/mydir/somedir/ C:/pvx/lib/”
Better is:
SETDRIVE “C:”
PREFIX “/myapp/data/ /myapp/files/ D:/mydir/somedir/”
Firstly, you do not need /pvx/lib in your search path. Any PxPLUS utility and any PxPLUS subdirectory can be called or found by prefixing with '*'.
e.g. CALL “*web/email” instead of CALL “\pvx\lib\_web\email”
Secondly, by omitting the drive letter, PxPLUS does not need to check whether the drive exists, saving time.
If possible, put the path with a different drive letter at the end of the search path.
OPEN (1) FILE$
OPEN (1,ISZ=1) FILE$
OPEN (1,ISZ=n) FILE$, waar n>1
| OPEN (1) | OPEN (1,ISZ=1) | OPEN (1,ISZ=n) n>1 | |
|---|---|---|---|
| 0D0A | 0D0A | 0D0A000000… | |
| WRITE | 8A0D0A | 8A | 8A0000000000… |
| WRITE RECORD | 0D0A | NOTHING | 000000… (tot LEN=n) |
PxPLUS first tests the first record of a ‘serial’ file. If a character is found outside the range from a ” ” (space) to a “~” (tilde), PxPLUS considers the file a binary file and the rules of ‘OPEN (1,ISZ=1)’ apply.
You must LOCK the file if you want to write to it.
PxPLUS handles the file in a record-oriented way.
The IND() function gives you the current record.
PxPLUS always appends $0D0A$ (1) at the end of a record.
In the case of a WRITE command, an extra field separator ($8A$) (2) will be added just before the record separator ($0D0A$)
A ‘READ RECORD’ scans the data in the file for a $0D0A$ byte combination.
A ‘READ’ implies a ‘READ RECORD’. The data from the ‘READ RECORD’ is used to populate the variables, where $8A$ functions as a field separator.
A ‘READ (1,IND=n)’ reads the n+1th record.
1 record separator
PxPLUS for Windows: record separator is $0D0A$
PxPLUS for UNIX: record separator is $0A$
In my examples I have always used $0D0A$.
2 field separator
The default field separator is $8A$, but can be changed with the ‘FS’ parameter.
If you open a file with ‘,ISZ=1’, you open the file in BINARY mode, even if it is a KEYED file.
To be compatible with other Business Basics, ‘ISZ=-1’ is allowed.
This type of OPEN implies a LOCK on the file.
PxPLUS handles the file in a byte-oriented way.
The IND() function gives you the byte pointer or, in other words, the number of bytes you have read.
PRINT X$ writes X$+$0D0A$
WRITE X$ writes X$+$8A$
WRITE RECORD X$ writes X$ and adds nothing to the variable, but if the variable is empty a $00$ byte is added.
Normally you read the file with READ RECORD(1,SIZ=nnn)X$
Otherwise, ‘SIZ=1’ is taken.
‘READ(1,IND=n)’ reads the n+1th byte.
Be careful with this method of reading and writing.
Always check if the result matches what you intended.
‘PRINT’ writes the variable(s) to the file. Each PRINT is terminated with $0D0A$.
Consecutive PRINTs can be performed. No field separator between two fields.
When the n number of bytes is reached, an ERROR #1 is generated.
If the n number of bytes is not reached, the rest of the n bytes is filled with $00$
‘WRITE’ writes the variable(s) to the file. A field separator ($8A$) is added after each field. The remaining n bytes are filled with $00$.
‘WRITE RECORD’ writes the data to the file without a separator. The remaining n bytes are always filled with $00$.
A ‘READ’ implies a READ RECORD with n bytes. The variables are populated based on the record read.
A ‘READ RECORD’ reads n bytes (n = specified in the OPEN)
A ‘READ RECORD (1,SIZ=x)’ reads x bytes.
Summary
WRITE PROCEDURE
SERIAL F$
OPEN LOCK (1) F$
PRINT (1)"10 REM"
PRINT (1)"20 BEGIN"
PRINT (1)"30 FOR I=1 to 10"
PRINT ...
PRINT (1)"9999 END"
READ PROCEDURE
CLOSE (1)
OPEN (1)F$
MERGE (1)
WRITE PROCEDURE
SERIAL F$
OPEN (1,isz=1) F$
DIM X$(128)
X$(1)=SOME_CODE$
X$(25)=OTHER_STUFF$
...
X$=X$+$09$
WRITE RECORD (1)X$
READ PROCEDURE
OPEN(1,isz=1)F$
GET:
READ(1,siz=129,end=DONE)X$
GOTO GET
DONE:
READ PROCEDURE
OPEN (1) F$
GET:
READ(1,end=DONE)X$,Y$,Z$
GOTO GET
DONE:
WRITE PROCEDURE
SERIAL F$
OPEN LOCK (1) F$
PUT:
A$= ... , B$= ... , C$= ...
WRITE (1)A$,B$,C$
GOTO PUT
0010 BEGIN ; PRINT 'CS','SB'
0020 FOR I=1 TO 2
0030 LET F$="c:\tmp\erase.me"; ERASE F$,ERR=*PROCEED; SERIAL F$
0050 !
0060 IF I=1 THEN OPEN LOCK (1)F$; PRINT "OPEN (1) "
0070 IF I=2 THEN OPEN LOCK (1,ISZ=1)F$; PRINT "OPEN(1,ISZ=1)"
0080 !
0090 PRINT (1)"111"
0100 WRITE (1)"222"
0110 WRITE RECORD (1)"333"
0130 PRINT (1)"444"
0140 WRITE (1)"555"
0150 WRITE RECORD (1)"666"
0160 !
0170 CLOSE (1); OPEN (1,ISZ=1) F$
0180 READ RECORD (1,SIZ=-1000) X$
0190 PRINT 'LF',"Binary file contents: ",'LF','LF','SF',HTA(X$),
0200 !
0330 CLOSE (1)
0331 PRINT 'SB','LF'
0340 NEXT I
A Link File is a PxPLUS file used to create an ‘ALIAS’ name for a specific ‘port’ or ‘file’ and to link a Device Driver to it.
A PxPLUS Link File is a small, simple file consisting of three parts.
– The ‘header’, which contains the type of Link File.
– The name of the ‘other’ port or ‘other’ file.
– The name of a Device Driver (CALL program) that will be executed after the ‘other’ file is opened. (see Device Driver below)
That’s really all there is to it… Link Files are small files in a directory like many others and follow the same rules as other files. Therefore, under UNIX you must pay attention to upper and lower case letters.
There are three different types of Link Files, indicated by the ‘header’ of the Link File: [Pvxlnk], [Pvxdev], and [Pvxapr]. Internally, PxPLUS handles them differently.
Let’s briefly talk about the ‘header’ of a file.
All PxPLUS files have a ‘header’. In ‘KEYED’ files you see [PVXKEY], and ‘INDEXED’ files have [PVXIND].
When PxPLUS opens a file—any file—it immediately reads the first 512 bytes (or less). It checks whether the ‘header’ starts with ‘[Pvx’, and thus instantly determines if it is one of its own files. Any other file is considered an ASCII file.
If it is a ‘keyed’ file, PxPLUS will process it appropriately. The interpreter knows the internal structure and can read the correct records.
If it is a Link File, PxPLUS knows to handle it differently from a ‘keyed’ file.
Since PxPLUS has already read the first 512 bytes, it has the entire Link File in memory. PxPLUS then analyses the rest.
From position 9, length 60: the name of the ‘other file’.
From position 69, length 12: the name of the ‘CALL’ or Device Driver.
Internally, PxPLUS closes the Link File. On the same channel, PxPLUS opens the ‘other file’ and ensures that the Link File name is shown when you execute PRINT FID(channel). Before the Device Driver name, ‘*dev’ is prefixed, which means Device Drivers are always located in ‘…../lib/_dev/’. Finally, the ‘CALL’ is executed.
You must ensure that:
1) The ‘other file’ must be openable in PxPLUS — correct permissions, correct path, correct name (case-sensitive).
2) The Device Driver must be loadable and executable using the command: CALL “*dev/<program>”.
There is, of course, a utility program to create Link Files, namely ‘*UCL’.
As mentioned, there are three types of Link Files. Their respective ‘headers’ are: [Pvxlnk], [Pvxdev], and [Pvxapr].
These ‘headers’ tell PxPLUS how to handle them differently.
[Pvxlnk] is used to link to another file without a Device Driver. For example, you could move the file ‘CUSTOMERS’ to another drive such as ‘F:\DATA\CUSTOMERS’ and create a Link File named CUSTOMERS. This way, you do not need to change your programs.
[Pvxdev] is probably the most used type. It opens another file or port and calls the Device Driver. This type is needed for printers and similar devices.
[Pvxapr] is a Link File for ‘slave’ printers—printers connected to the printer port of a terminal. PxPLUS opens the ‘other port’, executes the ‘CALL’ program, and sends the ‘PS’ mnemonic to the printer. When the channel is closed, PxPLUS sends the ‘PE’ mnemonic.
A few Examples :
| Name of link file | LP |
| Name of file/device | *windev*;\\texas\HP on Ne01: |
| Selected driver | HPLASER |
| Name of link file | LP |
| Name of file/device | \\server_name\shared_printer_name\ |
| Selected driver | OKI24 |
| Name of link file | /MYAPP/P1 |
| Name of file/device | >lp -d queuename -c -s 2>/dev/null |
| Selected driver | EPSON |
| Name of link file | SPOOL |
| Name of file/device | /tmp |
| Selected driver | spooler |
| Name of link file | WINDOWS |
| Name of file/device | [wdx]*winprt* |
| Selected driver | myprog |
The name of the Link File is entirely your choice. The name of "the other file or port" must be a name that can be opened in PxPLUS. So physical ports (LPT1), or spool queues (>lp -dxxx -s ..), or UNC names (\SERVER\PRINTER), or TCP/IP ports ([TCP]1000;), ODBC connections, and so on …
The Device Driver is a CALL program that must be located in the “*dev” directory. You are free to create one yourself.
A PxPLUS Device Driver is a ‘CALL’ program used to initialize and prepare a file or port once it has been opened.
Example:
| Name of ‘link’ file | LP |
| Name of file/dev. | /dev/lp0 |
| Selected driver | OKI |
OPEN(1)"LP"
This would be the same as:
OPEN(1)"/dev/lp0"
CALL "*dev/OKI"
SETFID (1)"LP"
'OKI' is just a PxPLUS program. You can put anything in it. You can open other files, prompt the user for input, execute other CALLs—anything you can do in a regular CALL can also be done here.
Take a look at a Device Driver such as HPLASER. For example: LOAD "*dev/hplaser".
At the start, there is a line beginning with DEFTTY (LFO) cols,rows or DEFPRT (LFO) cols,rows.
DEFTTY and DEFPRT tell PxPLUS whether this is a screen or a printer. Without this, PxPLUS will assume it’s a file. This is how PxPLUS knows to return FIN() in TERMINAL format if DEFTTY is used, or FIN() in PRINTER format if DEFPRT is used.
COLS and ROWS are also used by FIN() and functions such as MXC() and MXL().
LFO and LFA are two system variables, like DAY or SSN.
LFO = Last File Open, LFA = Last File Accessed.
A simple program such as "*dev/hplaser" shows you that you can create your own mnemonics. These mnemonics exist as long as the channel remains open and are therefore channel-specific.
With the MNM() function you can read the value of a mnemonic and reuse it for another channel.
Example: You define the ‘PS’ and ‘PE’ mnemonics for your screen.
In the Device Driver for your ‘slave’ printer, you can retrieve the ‘PE’ and ‘PS’ mnemonics from channel 0 (your screen) and apply them to your printer channel.
There are also mnemonics with special meanings.
‘*C’ is a mnemonic automatically sent when the channel is closed.
Usually it contains ‘reset’ codes to initialize the printer.
‘*R’ can contain an OS command that will be executed when the channel is closed. Example: ‘rm /tmp/lock_file’
And then there are ‘*I’ and ‘*O’. If you know UNIX ‘mapchan’, you understand what *I and *O can do.
‘*I’ is an input conversion table, and ‘*O’ is an output conversion table.
These let you change certain characters into others during input and/or output.
Example: MNEMONIC ‘*O’=$00 01 02 03.. .. ..1C 1D 1E 1F 2E 21 22 .. .. .. .. .. FE FF$
This table will display a space as a period. (Hex value of a space is $20$, replaced by $2E$, a period)
An example of a more complex Device Driver could be:
! My driver
PCHAN=LFO, PNAME$=FID(LFO)
CLOSE(PCHAN)
[code that checks for a lock file]
[if lock file exists, EXIT 14 so OPEN returns ERROR=14]
[code to create a lock file]
[code to create a temporary file: ‘MYOUTPUT’]
OPEN(PCHAN)"MYOUTPUT"
[call program with mnemonic definitions]
SETFID (PCHAN) PNAME$ (yes, SETFID works on files too!)
EXIT
An interesting PxPLUS function is OPT().
If you do OPEN(CHANNEL,OPT="hello")NAME$, then OPT(channel) returns ‘hello’. You can store anything in OPT= during OPEN and retrieve it in the Device Driver.
Example:
You have a Link File named ‘LP’, the ‘other port’ is ‘/dev/lp0’ and the Device Driver is ‘myprog’
OPEN(1,ERR=stmt,OPT="Check if the correct paper is loaded!") "LP"
<PxPLUS Internal>
[Reads ‘LP’ link file]
[Closes file ‘LP’]
[Opens ‘/dev/lp0’]
[Uses SETFID to rename ‘/dev/lp0’ to ‘LP’]
[Calls "*dev/myprog"]
<In ‘*dev/myprog’>
options$=OPT(LFO)
[options$ now contains "Check if the correct paper is loaded!"]
IF NOT(NUL(OPTIONS$)) MSGBOX OPTION$,"Message"
[call program EXITS]
<PxPLUS Internal>
[Passes any EXIT numval back to OPEN]
A lesser-known function is SETDEV TSK().
If you have worked with BBx, you might have used TSK() to list printers. PxPLUS can emulate this.
This command loads the TSK() so the TSK() function returns the expected content as if it were BBx. The only drawback is that you cannot clear a TSK().
SETDEV TSK() $0100$+"LP"+$00$+">lp -dq1 %COPIES% -s 2>/dev/null"+$00$
SETDEV TSK() $0100$+"P1"+$00$+"/dev/lp1"+$00$
You can retrieve the content with X1$=TSK(0) and X2$=TSK(1)
As you see, almost anything is possible in a Device Driver.
Take a look at ‘*dev/spool’. For ‘the other file’, a directory name is expected. The directory is closed, a temporary file is created in it, and the name is reset to what it was. All ‘prints’ go into this temporary file and, when the channel is closed, the OS command ‘>lp -d…’ is executed via the ‘*R’ mnemonic. You can put multiple commands in ‘*R’, separated by a ‘;’ like any OS command.
A special Device Driver is ‘*dev/windows’. This is used by ‘PxPLUS for Windows’.
It’s best not to modify this program! In fact, never modify a driver in ‘*dev’ because a new PxPLUS installation will overwrite your changes. You can, however, make copies under another name and modify those as needed. For customizations, use the ‘lib/_udev’ directory. (If it doesn’t exist, you may create it)
PxPLUS always checks this directory for a matching terminal driver. In this case, ‘WINDOWS’. If found, it will be executed.
Example: You want blue text on a white background.
Create a program ‘*udev/windows’
0010 ! Windows
0020 print ‘blue’,’_white’,’df’,’cs’,
0030 exit
>save"*udev/windows"
>start
It’s really just terminology. The whole concept of Link Files and Device Drivers is quite simple because… anything is possible. You can do anything you can imagine… because it’s ‘just’ a CALL program. Link Files are simply a way to assign an ALIAS name to a file or port or <fill in yourself>.
(Original text by Gord Davey, reworked and expanded by Tino Vanholst)